Showing posts with label Meat. Show all posts

Tuesday, 17 August 2010

Cheese stuffed burger


I've been counting that this summer, I have attended quite a few BBQ summer party over at friends. Indeed I've shy away from the fast food burger chain like Mc Donalds, Burger King during this summer as I realized homemade burger tasted so good, better still if you could grill it over the BBQ. As I'm hoping for Weber BBQ gas grill to be presented to me , I can only be contended grilling it with my lovely cast iron grill and my Neff oven, result is still good :-)
So I decided to make do with the leftover minced beef and some gorgonzola cheese hoping it will turn out lovely. Cheese stuffed burger.....anyone interested out there?

Cheese stuffed burger
Ingredients (make 2 burgers)
  • 330-350 gm minced beef 9preferably with 80% lean and 20% fat)
  • 60 gm Gorgonzola cheese
  • 1/2 tsp grated nutmeg
  • 1-2 tsp of salt-or to taste
  • 1 medium white onion-finely chopped
  • 1 egg
  • 2-3 tbsp bread crumbs
  • 1 tsp Dijon mustard
  • dash of black pepper
  1. In a mixing bowl, add all the ingredients except gorgonzola cheese and give a good mix with your hands. Form 2 patties.
  2. Shape the Gorgonzola into 2 balls.
  3. Wrap the patties over the cheese ball. If you prefer you can coat the burger patties with chopped taragon leaves.
  4. Set the burger to rest in the fridge for at least an hour before you grill them.
  5. You can use oven at 160C to cook for 30minutes or over the grill pan for 20minutes or so. Please note that the cheese might leak out during grilling. Therefore I prefer to oven baked them for 25minutes, and finally subjected them to grill pan for 2 minutes each side.
  6. Serve with salad, cucumber, onion and tomato over white bun. If you prefer you could actually add guacamole as sauce over the burger......rather than the usual tomato sauce.
One bite and the runny cheese oozing out ............. Burger will never be the same ..... :-)
Delicious..... and I throw in some homegrown salad/tomato too.


Pictures from my garden as usual.....


Sunday, 14 March 2010

Sunday Roast


This is a classic British meal served on Sunday for lunch. It's normally consist of a type of roast meat (chicken, pork, lamb, beef) and served with roast potato, with sides of yorkshire pudding, vegetables, stuffing and good gravy.
I wouldn't say NO to this classic meal anyday of the week, imagine the flavorsome chicken with it's delicious crispy skin plus the perfect golden and crispy roast potato......you've got the idea.
My British friend always invited me over for lovely roast dinner, am gosh their roast potato is to die for. So I learnt a bit of skill from them on how to create that lovely roast potato and for the chicken-the oven will do justice for me I hope. :-)
So I thought, I will experiment with this classic dish, off to supermarket to get a medium size free range chicken (1.5kgs), king edward potatoes and some vegetables.


Roast chicken with roast potato
Ingredients (serve 4)
  • 1 whole free range chicken
  • some sea salt
  • Rosemary sprigs
  • 2 carrots-diced
  • 1 medium onion-diced
  • 4 large King Edward potatoes-cut into 6 for each potatoes
  • 100 ml sunflower oil (if you prefer, you can do with 50ml sunflower oil+50ml goose fat)
  1. Preheat the oven to 190C.
  2. Clean the chicken and pat dry. Stuffed the chicken cavity with carrots, onion and one sprigs of rosemary. Use a toothpick to seal up the bottom. Rub with sea salt on the skin and top with some rosemary sprigs. Place on a roasting tin.
  3. Pour the oil into another roasting tin. Put the tin into the oven. Also put the chicken roasting tin into the oven as well. Let it roast for 20minutes at 190C.
  4. Put the potato into a pot with lid and parboil for 10minutes. Off the heat. Drained. Pour it back into the pot and close the lid and let itself steam for another 10minutes or so to loose some moisture, the potato should look slightly soft and fluffy.
  5. Take out the oil roasting tin, place the potato into the tin, it should be bubbling away. Use a spoon to scoop up some oil to baste the potato. Place the tin back into the oven.
  6. Turn the oven heat to 160C now. This will ensure the slow cook process of the chicken and retain it's moisture.
  7. Baste the potato every 30minutes. The chicken should be cook after 1.5hrs.
  8. By the time the chicken cook, the potato will be have acquire a golden brown skin. Remove the potato and drained with paper towel.
  9. Place the chicken onto a big serving plate, carved and served with the roast potato and onion gravy. The vegetables in the cavity will taste absolutely gorgeous too.
There you go, Sunday lunch sorted out. :-)
That's a real good roast chicken and successful roast potato too. Yummy.

And here carpet of crocuses along The Backs in Cambridge, and couldn't resist my Pashley against the backdrop of crocuses. Ahhhh....... it's Spring :-)


Monday, 8 February 2010

Chinese stir fry beef and tenderstem brocolli with noodles


Chinese New Year is just around the corner, I believe many of you who are celebrating it must be busy "spring cleaning", baking cookies, decorating houses with auspicious items and etc. For me, "spring cleaning" - tick, baking-intend to, decorating with auspicious item - could be tough, I can't even find ang pow packets here. Indeed, the Chinese New Year has all it do's and don't. I would rather spend my energy to create some nice recipes to whip out on Saturday, the eve, for friends to enjoy. And of course to inspire people who reads my blog to try out the recipes and enjoy them too.

For those who know me well, I'm not a keen beef meat eater. Maybe my mum did not train us to eat beef since we're young as she herself has allergic towards beef, and hence beef is not something common on our palette. However I did try a stir fry beef noodle and it did change my opinion on this rarely eaten meat for me. The red meat taste is not overwhelming and is so gorgeously tender, and yes it's acceptable for my taste department. I started out to like this stir fry beef and now it's a love affair. This is a simple recipes and I believe in no time you'll love it too. It will be a lovely noodle dish for Chinese New Year rather than the traditional longevity noodles. :-)


Chinese stir fry beef and tenderstem brocolli with noodle
Ingredients (serve 4)
  • 200 gm lean pork fillet-thinly sliced perpendicularly to grain
  • 300 gm egg noodles/spaghetti- I used spaghetti here
  • 4 cloves garlic-finely chopped
  • 1 packet of tenderstem brocolli (200 gm) / Chinese Kailan
  • 2 tbsp of vegetable oil
Marinating ingredients for beef
  • 1.5 tbsp light soya sauce
  • 1 tbsp sugar
  • 1 tbsp shaoxing wine
  • 1 tsp of ginger juice
  • 2 tsp of corn flour
  • 1 tsp sesame oil
  • 1 tsp of dark soya sauce/caramel sauce
  • 1 tbsp oyster sauce (optional)
Noodle sauce
  • 300-400 ml chicken stock
  • 1/4 tsp of white/black pepper
  • 1 tsp sugar
  • 2 tbsp of light soya sauce
  • 1 tbsp shaoxing wine
  • 1 tsp sesame oil
  • 1 tbsp oyster sauce (optional)
  1. Marinate the beef with marinating ingredients for 30 minutes.
  2. Boil a pot of water, once boiling, blanched the tenderstem brocolli for 30 seconds and remove. Then add in spaghetti to cook. Follow the spaghetti packet instruction, i.e if 15 minutes require to achieve al-dente, drained after 12-13minutes.
  3. Heat a wok on high heat. Add in a tbsp of vegetable oil. Once it's hot, add in the garlic and lightly brown. Then add in the beef, lay thinly over the wok and let is slightly caramelised, this will take about 1 minute or so. Then flip over and stir fry for another minute. Do not overcook as you want your beef to be just tenderly nice. Remove to a plate.
  4. Add in another tbsp of oil onto the wok, throw in the green and stir fry quickly to nicely coat the vegetable with oil. This will take about a minute. Remove to a plate.
  5. Then pour in the noodle sauce, once it start simmering, turn the heat to medium. Add in the spaghetti and stir, let it absorb the liquid. When the liquid is almost absorbed, turn off heat, add in the beef and brocolli stem and mixed well. Served hot with pickled green chillis.


Thursday, 4 February 2010

Steam Chicken with Dong Quai, goji berries and red dates


Bet many of you must be checking my blog and wonder whereabout Apron's Delight is. Been quite busy lately at work, an early spring clean my house during weekend and watching some really good documentaries on TV. And I am still keeping my resolution to keep cycling to work at least 3 times a week during winter (note: cold and dark here in winter), but nevertheless 36 miles per week for the last 6-7 weeks felt like an achievement.
Yes indeed it's also good time in winter to replenish one's body with nutritious meal. Here's a really simple and good remedy for women well being. My mum used to cook this dish for me. So simple and yet really delicious with a bowl of rice.


Steam Chicken with Dong Quai, Goji Berries and Red Dates
Ingredients (for 2 persons)
  • 2 chicken legs portion
  • 6 slices of dong quai (Chinese angelica root)
  • 6 red dates-pitted
  • 1 tbsp of Goji berries
  • Dash of kosher/sea salt
  • 8 tbsp of water
  • 1-2 tbsp hard liquor-Brandy, Cognac, XO
  • aluminiun foil
  1. Wash the chicken and pat dry. You can opt to chop into smaller pieces.
  2. Rub the chicken with sea salt.
  3. Wash the dong quai, red dates, goji berries. Drained. Lay them on the aluminium foil. Top them with the chicken pieces.
  4. Slowly wrap the parcel, before sealing, pour in the water and brandy.
  5. Heat up a steamer and let it steam for 25-30minutes. Ensure when you prick the chicken there is no bloody liquid as it's still not cook, continue to steam on high heat.
  6. Serve hot with rice.
Of course one should read about what is dong quai if in doubt.


The arrival of snowdrop signifies spring is just around the corner, I can see myself smiling

Sunday, 22 November 2009

Sweet and Sour Pork with Wrapped Water Chestnut

One of the main signature dish of Chinese restaurant or takeaway has to be Sweet and Sour Pork. This dish meant to be very pleasing to the eyes, opens up one appetite and wanting to go back for second. A lot of the Chinese restaurants here serving this dish, I find it has too much of white vinegar taste to it or the sauce being too starchy. I decided to whip up a nice sweet and sour dish with a twist, don't be traumatized by a little effort for I know this recipes will be a keep for good authentic Chinese sweet and sour to please your guests.


Sweet and Sour Pork with Wrapped Water Chestnut
Ingredients ( for 2 persons)
  • 150 gm lean pork fillet/chicken fillet
  • 6 water chestnut-peeled and quartered
  • some toothpick
  • 1 egg
  • 3 tbsp rice flour + 1/2 tsp soda bicarbonate
  • oil for deep frying
Marinating
  • 1 tsp sesame oil
  • 1 tsp shaoxing wine
  • 1 tsp of sugar
  • 2 tsp of light soya sauce
  • 1/2 tsp white pepper
Sauce
  • 1/2 green/red/orange/yellow pepper bell-diced
  • 1/2 big onion-diced
  • 1 slice of pineapple (optional)-diced
  • 1 big juicy tomato - diced
  • 1 tsp white vinegar + 1 tsp lime juice
  • 1 tbsp of sugar
  • 3 tbsp of Thai sweet chilli sauce
  • 1 tbsp of tomato sauce
  • 2-3 tbsp of water
  • 1/2 tbsp vegetable oil

  1. Sliced the pork thinly with a sharp knife to make 3x3 cm slice. You should be able to make about 20 slices.
  2. Tenderized the meat with a meat mallet. Then marinate them with the marinating ingredients for an hour.
  3. After marinating, take a slice of meat and a cube of water chestnut and wrapped into a small parcel. Secured with a toothpick. Repeat until done.


  4. Beat an egg in a bowl and seive rice flour+soda bicarbonate into another bowl. Then dip the meat into the egg and transfer to the rice flour to coat evenly.
  5. Heat up the wok with oil for deep frying. Once it's hot and ready, drop in the meat parcel and fry for 1.5 minutes on each side. You should see it's slight turning golden brown, removed the parcel from the hot oil. In order to create a crisp pork, we need to deep fry again for second time. Drop in the meat parcel and continue to stir. Removed and drained after it has browned-about 1minute or so.
  6. Removed the toothpick from the meat parcel.
  7. For the sauce, heat up a pan. Pour in the vegetable oil, once it's sizzling hot, add in the onion and pepper and stir fry for 2 minutes. Then add in all the other sauce ingredients and stir fry for a minute. Once sizzling, off the heat, add in the meat parcel and coat evenly. Dish up and served with hot rice.
The main difference you'll notice is the freshness of the ingredients, a bite onto the crispy meat with added crunchiness of the water chestnut is totally right :-) .
I really like this dish as it's colourful, so much of taste to it and make me salivating again.....
Give it a try.

Friday, 16 October 2009

Japanese Chikin Kare (Chicken Curry)


My first experience of Japanese Chicken Curry was like 5 years ago at a Japanese restaurant in Singapore. It is very different from the type of curry that I'm used to, the Japanese curry is milder, sweeter, more like a stew and one would not feel guilty of indulging in it as I think it's rather healthy type of curry, no traces of coconut cream or cream in it. It's so comforting meal for a cold nite and nevertheless easy to prepare.

The Japanese golden curry cube


Japanese Chikin Kare (Chicken Curry)
Ingredients (serves 4)
  • 400 gm chicken breast meat cut into bite size
  • 2 big onions diced
  • 2 big potatoes diced
  • 3 big carrots diced
  • 750 ml chicken stock/water
  • 3 golden curry cube
  • 2 tbsp cooking oil
  • 1 tbsp honey
  • Spring onion for garnishing
  1. In a pan, heat the oil and sweat the onion. Then add in the chicken and stir fry for 3 minutes or so. Then add in the carrots, potatoes and the chicken stock. On high heat bring it to a boil, then turn the heat to medium to low and let it simmer for approximately 25-30mins until soft.
  2. Then add in the cube and continue to stir until it completely melts. Continue to stir to ensure it mixes well. Add in the honey. Simmer for additional 10minutes or so.
  3. Turn off heat. Scoop and serve warm on rice.
You will be back asking for second :-)


I use this S&B brand-there are total of 8 cubes in the packing

Friday, 2 October 2009

Foochow Red Wine Chicken


As the weather is getting cooler, officially we're in autumn now, gosh how time flies, it's October now. So I'm yearning for revitalizing and warmth food for the cooler evening/nites, at least to be warm before I turn on the heater comes winter. Still remember the Foochow red glutinous rice wine that my mum made in my previous post? Typically we use the wine to cook the fame Foochow Red Wine Chicken serve with longevity noodle (mian xian). As a Foochow, this is the signature dish that we grew up with.


Foochow Red Wine Chicken with longevity noodle
Ingredients
  • Half free range chicken (kampung chicken is the best)
  • 1 cup of Ang Chiew (red wine)
  • 1 tbsp of Ang Zhao (red wine sediment)
  • 80-100 gm of ginger-julienned
  • 3 tbsp of sesame oil
  • salt to taste
  • 1/2 tbsp of sugar
  • 1 litre of water
  • 3 bunches of longevity noodle (if you can find the Sitiawan mian xian-they taste really good)
  1. Cut the chicken into bite size. Marinate it with the ang zhao, leave it for 30minutes or so.
  2. In a wok, heat up the sesame oil. Once it is smoky, throw in the julienned ginger and stir fry till fragance. I love this aroma.
  3. Then pour in the chicken and stir fry continuosly till slightly cook. Add in the and chiew and stir fry again. Add in the salt and sugar and continue to stir fry for a minute or so. Pour in the water and close with a lid. Let it simmer for 10-15minutes till cook.
  4. While the dish is simmering, prepare a pot and boil some water to cook the longevity noodle. When it is boiling, add in the noodle and let it cook on high heat. Remember to use a chopstick to stir the noodle so that it doesn't stick together during the cooking process. Once the noodle is cook, it will float. Drained. In a bowl, place the noodle and laddle some red wine chicken and soup onto it.
  5. Serve while it's still piping hot.
I'm enjoying this dish :-)

Monday, 23 March 2009

Tender pork rib with yam


This is my hometown dish, only served as one of the dishes during wedding and birthday banquet. Me and my sis normally will aim for the yam(taro) that was perfectly steamed and moist, absorbing the savory sauce during steaming. I like this dish because the sauce is very well absorbed into the meat . It requires about 2-2.5hours to steam to perfection, the meat on the rib is so tender and lovely. Even my mum will be so envy of me now. :-)


Tender pork rib with yam(taro)
Ingredients (good for 2 persons)
  • 300 gm pork rib (chopped into 1.5inches long)
  • 2 tbsp of shaoxing wine
  • 1 tbsp of soya sauce
  • 1 tbsp of honey
  • 1 tsp sesame oil
  • a dash of pepper
marinate the pork rib with the above ingredients overnite.

Sauce
  • 2 tbsp tomato sauce
  • 2 tbsp Maggi chiili sauce/ sweet Thai chilli sauce
  • 1 tbsp caster sugar
  • 1 tbsp soya sauce
  • 1 tsp dark soya sauce
  • 1/2 tsp oyster sauce
  • 1/2 tsp rice vinegar
  • 1/2 tsp sesame oil

  • 3 slices of spicy Szechuan preserved vegetable (soak in water for 10mins to remove the chilli paste and the saltiness)
  • 1/2 big onion (diced)
  • 1/2 green pepper, 1/2 red pepper
  • 50 gm yam cut into wedges of 1cm thick
  • 1 red chilli (use more if you prefer it to be more spicy)
  • oil for frying
  • some corn flour
  • some sesame seed, corriander for garnishing (optional)
  1. In a wok/fryer, fry the yam till lightly brown and drained. Coat the marinated pork rib pieces with a little of corn flour and fry them till lightly brown.
  2. In a wok, pour in a tbsp of oil, once hot, add in onion, chilli and stir fry till fragant. Add in green, red pepper and Szechuan preserved vegetable and stir fry for 2mins. Then add in the fried pork rib and yam. Pour in the sauces and coat well. Add in 4 tbsp of water and continue to stir. Let it simmer for 3mins until the sauce thickens. Then scoop the dish into a porcelain bowl and cover it with a flat plate. Ensure that it's compacted.
  3. Prepare a steamer. Place the bowl with flat plate into the steamer and let it steam for 2hours or until the meat is soft. You can use a fork to prick the meat, at this time the fork could easily prick into the meat without any effort.
  4. Once done, removed from heat and turn the plate over and remove the bowl. Garnish with sesame seed/corriander . Serve with rice.
It's nice indeed. All the essence of the flavor(vegetable & sauces) blended and absorbed nicely into the meat. What an enjoyment.

Sunday, 15 February 2009

烧 鸭 腿 飯 Chinese Roast Duck Leg Rice

Over here in UK, traditionally we've English roast Sunday be it chicken, pork or beef, served with crispy roast potato, brocolli, yorskshire pudding and dollop of sauce. Roast meat which are properly done are very satisfying meal as it requires lot of patience :-). One of my English friend made the best roast potato I ever tried.
Again I'm craving for Chinese roast, back in Singapore/Malaysia one could easily drop into hawker centre/ market to get the roast anytime and fairly cheap . So here I am, putting my roasting skill to the test. Experiment: Duck . I've noticed that I have yet to post anything on duck. This dish is rather popular in chicken rice stall back home. Crispy aromatic skin, tasty and juicy meat.... you've got the picture? It's involves some additional work for a really nice roast duck, hence patience is needed here. Lots of patience.....


Chinese Roast Duck Leg Rice (烧 鸭 腿 飯)
Ingredients (good for 2)
  • 2 duck legs (about 450 gm)
  • marinate : 1 tbsp of five spice+ 1 tsp salt +1 tsp sugar
  • basting : 1 tbsp rice vinegar+ 1 tbsp of honey
  • 2 bowl of cooked Jasmine rice
  • some greens ( can use bok choy, cucumber)
  • chilli sauce: sambal belacan or Chow Zhou chilli paste
Roast duck sauce
  • 1/2 tbsp of duck fat
  • 1 tsp of hoisin sauce
  • 1 1/2 tbsp of light soya suace
  • 1/2 tsp of dark soya sauce
  • 1/2 tsp of sugar
  • 1/2 tbsp shaoxing wine
  • 5 tbsp of water
  • 2 cm of ginger
  • some corn starch solution to thicken sauce if needed
  1. Boil some water to blanch the duck. Once boiling, place the duck leg and blanch for about 5 minutes. Removed. Pat dry and marinate it. Hang the duck leg (I left it overnight). This aim to dry the skin and drain some fats off.
  2. On a grilling pan, grilled the duck leg on both side for about 10minutes until brown. At this stage you'll collect some fats for duck sauce and also will shorten the time for roasting and ensure crispy skin.
  3. Heat the oven to 170C and roast the duck leg for 35minutes and then 25 minutes on 190C.. Baste the duck leg with the basting mixture(you'll need to baste about 4 times during the process)
  4. Meanwhile you can prepare the roast duck sauce. In a pan add 1/2 tbsp duck fats and stir fry the ginger till fragant. Add in all other sauce ingredients and simmer for about 5 minutes. Thicken with corn starch solution if neccessary.
  5. Once the duck ready, served with rice, greens and the sauce.
Still need to perfect the roasting color though.....apart from that little charred imperfection, my roast craving is satisfied.

Sunday, 16 November 2008

Pandan Chicken (Screwpine leaves chicken)


Pandan leaves can be found in many Asian store, a bundle of leaves cost around 2 quid. The leaves bring with it aromatic sense and very Oriental feel to it. We used a lot of pandan in Malaysian, Thai, Singaporean and Indonesian cooking. For example when one cooked rice in coconut milk, throw in a pandan leaves tied in a knot, you'll be amazed by what this little green could deliver.

One of my friend has given me loads of pandan leaves for FREE. Well been awhile since I had Pandan Chicken I thought. Pandan chicken is distinctively Thai cuisine. Last week I was in a Thai restaurant for dinner but there is no pandan chicken on the menu. Somehow I felt this dish has been underestimated in many Thai restaurant abroad. Well, well...... if there is none, find way to make some.

This dish somehow has evolved into many varieties across South East Asia, with different spices used to marinate the chicken. However I'm still a die hard fan of Thai cuisines and stick to the authentic Thai version. This dish is simple and easy to make and verdict ..... marvellous .


Pandan Chicken

Ingredients (makes 15)
  • 300 gm skinless and boneless chicken thigh or chicken breast
  • 1 tbsp tumeric
  • 1 tbsp brown sugar
  • 2 shallots, finely chopped
  • 1 tbsp finely chopped ginger
  • 1.5 tbsp coconut cream
  • 1 lemon grass stalk finely chopped
  • 1 tsp salt
  • 1/2 tbsp fish sauce
  • 2 green chillis finely chopped
  • 8 pandan leaves
  • toothpick
  • Vegetable oil for deep frying
  1. Diced into cube the chicken into 15 portions
  2. Add all the other ingredients into the chicken and marinate for 2 hours
  3. Placed one piece of chicken onto a pandan leaves, roll the leaves over the meat. Use about half a leaves length for each chicken pieces. Secured with toothpick.
  4. Heat oil in a wok/fryer/pot, once heated put in the rolled pandan chicken into the hot oil and fry for about 7-8minutes, until golden brown.
  5. Removed the chicken and drained on oil paper.
  6. Served with rice or eat on it's own.......delicious.
Simple yet lovely..................

Saturday, 25 October 2008

Fancy MOS technology?

As most of my semiconductor friends might be wondering why I posted "fancy MOS?" technology on a Saturday. Hmnnn.... haven't she had enough of Vt, Idsat, Ioff and more of Moore's law during the weekdays? Well, well, it's not about microelectronics but rather chicken teriyaki rice burger from MOS burger(Japanese fast food chain). It's a pity that over in UK I can't find any MOS burger outlet. One of the unique burger bun in MOS burger is actually made of sticky rice. The rice bun is slightly toasted on both side, bringing a slight crisp on the outside and soft and moist on the inside. The bun goes really well with teriyaki chicken, few lettuce green and a dollop of Japanese mayonnaise. This rice bun, I called uniquely MOS burger technology. This is my first attempt in making the rice burger bun and it turned out really well, ahem, I must say even better than what you get from MOS burger.


Chicken Teriyaki Rice Burger

Ingredients (good for 2 burgers)

Teriyaki chicken
  • Half the ingredients from my teriyaki chicken recipes
  • some lettuce green
  • some Japanese mayonnaise
Rice Burger Bun
  • 1 cup of glutonous rice
  • 1 1/4 cup water
  • 1 tsp salt
  • 1/2 tbsp of cooking oil
  • 1 tbsp of cooking oil for toasting rice burger
  • Some vegetable oil for hand lubrication on hand molding the rice
  1. For Rice Burger, soak the glutinous rice overnite. Prepare a steamer, steam the glutinous rice with 1 1/4 cup of water for approximately 30-40mins till cook. You can use microwave but I find that steaming is better. After steaming, add in 1/2 tsp oil and salt, stir well and let to cool.
  2. Oil your palm and fingers with cooking oil, so that when you work on the sticky rice it won't stick to your hands. Take one tbsp of sticky rice and roll into a ball, then flatten it to about 1cm thick, with your hand press gently to compact it. Leave on a plate. Continue with the rest.
  3. Heat a non stick pan on low heat, brush with oil, once heated, place the rice burger onto the pan and let it toast till brown on one side, and turn to toast on the other side. Once ready place it on a plate, garnish with lettuce green, a piece of teriyaki chicken fillet and a dollop of mayonnaise.
Enjoy the different kind of burger bun. I did, I know one of my UK friend will be so envy of me now. :-)

Rice burger bun ready for toasting

Yummy

After making my lunch, I went out to my garden to harvest crysanthemum, loads of them. Better pruned them as the strong wind might damage the foliage. So I've got a scissor and pruned myself a vaseful of mum.
Pretty mum
Fake Van Gogh sunflower ?

It's been awhile since I last reorganised my kitchen cabinet. One started to realise one has so many hidden treasures that was forgotten. In my case some nice wines especially Inniskillin Ice Wine. Totally forgotten I did hide it in some corner of my kitchen cabinet. Then having to reorganise my western spices, Asian spices, tea/coffee/chocolates, and sauces cabinet. Aren't you impressed? :-)


My treasures.....wine


My tea/coffee/chocolates cabinet

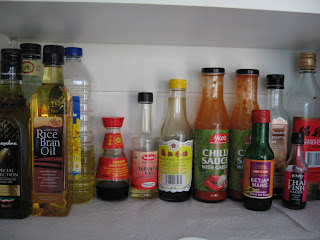
My sauces/oil cabinet

Spices cabinet

Friday, 24 October 2008

My Comfort Food


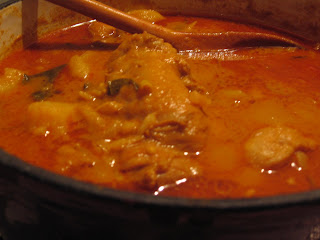
Finally I officially cooked something in my new cast iron pot. So versatile, so robust, so heat savvy and am sure it will be my favorite cookware. Investing a pot that could last me years and years itself already paid for the non lasting cookwares I had before. Some might wonder what did I cook in it. How about Malaysian chicken curry. The distinctive Malaysian chicken curry is signifies by the use of potatoes, lemon grass, kaffir lime leaves, candlenut (buah keras) and specially mixed curry powder. This is what I call comfort food for autumn.


Malaysian chicken curry (Kari Ayam)

Ingredients
  • 6 pcs whole chicken leg(cut 3 pc each)
  • 1 can coconut milk(400ml)
  • 300 ml water
  • 3-4 pc kaffir lime leaves
  • 1 lemongrass stalk
  • 4 tbsp Malaysian Adabi Chicken Meat Curry Powder
  • 2 candlenut/buah keras crushed
  • 2 shallots finely chopped
  • 1 big onion finely chopped
  • 2 slices of ginger, finely chopped
  • 2 chillis finely chopped
  • 4 big potatoes, peeled and cubed
  • 2 tbsp sugar
  • 2 tbsp salt
  • 4 tbsp cooking oil
  1. Wash and cut whole chicken leg,drain and set aside.
  2. In a pot, boiled the potatoes, just about to cook, drained and set aside.
  3. Add 4 tbsp of coconut milk to the curry powder to form paste and set aside.
  4. Heat slowly the cast iron pot, once heated, add in shallots, ginger, onion, chillis, lemongrass, kaffir lime leaves and fry for awhile till lightly brown and fragrant. Then add in the curry paste and stir. Add in chicken and stir fry for 2-3minutes.
  5. Then pour in the remaining coconut milk and stir, remember to slowly simmer and not on high heat as this will cause the coconut milk to curdle. Add in potatoes, sugar, salt, candlenut and let it simmer for 25minutes. By this time the potatoes has soften and some might have dissolved into the gravy and thicken. If you find it too thick, add in the water.
  6. Served with rice, prata, naan, or even noodles.
With this big pot of curry it's gonna last me for 3 meals :-) . Yummy. Brrrrrp.......