Thursday, 23 July 2009

Petite Madeleine


This is one of the French recipes that I hold highly and never fail to impress your guests for a delightful afternoon tea session. Pretty to the eyes, these delicate shell like madeleines will have your guests asking for second, third until all is cleared up and still wanting for more.
I personally like these madeleines, as the outer layer is so crispy and yet soft inside, accented by hint of orange zest...... what a bliss to had with a cup of coffee or tea. To tell you the truth, the pictures I took above is only my second attempts on madeleine. The first attempt was wiped out by me and my guests before I had the chance to photograph them.
Let me share with you this delightful and mouthful petite madeleine.


Petite Madeleine
Ingredients (make about 14-18 madeleines)


  • 3 large eggs
  • 100-125 gm sugar ( I tend to use 100gm as I prefer it less sweet)
  • zest of 1/2 orange
  • 1 tsp vanilla
  • 110 gm cake flour
  • 60 gm finely ground almond
  • 1/2 tsp baking powder
  • 1 tbsp orange juice
  • 125gm butter
  • some icing sugar for dusting


  1. In a pan heat , melt and simmer the butter till brown, should give you a nice aroma. Sieve and cool.
  2. In a mixing bowl, whisk the egg and sugar with an electric mixer till ribbon consistency, will take about 10minutes. Then add in zest and vanilla and mixed well.
  3. Slowly use a spatula to mix in the flour and blend well. Add in almond flour, salt , orange juice and baking powder and blend well.
  4. Lastly pour in the melted butter and mixed well.
  5. Put in the refrigerator and cool for about 4hours. By this time your batter should be slightly thicken.
  6. Brush the madeleine mold baking tray with some butter and dust with some flour. Then scoop about 1 tbsp of the batter and filled into the pan. This amount should be about 2/3 full in the shell mold. Don't worry if it's look unsightly at the moment. Repeat till 12mold gas been filled.
  7. Heat the oven to 180C. Bake for 15minutes or till olden brown. Typically I will turn over when the front side turn brownish with a fork in order that the bottom side will brown evenly as well.
  8. Serve and enjoy.
P/S: For cake flour I use 110gm plain flour, remove 2 tbsp of flour and replace with 2 tbsp of corn flour and 1/2 tsp of baking powder and seive about 8-10times till light.

Tuesday, 21 July 2009

Stir Fry Prawn in XO sauce


This is one of my favorite no hassle quick stir fry recipes. I would say any seafood blend particularly well with XO sauce (this sauce originated from Cantonese cuisine in Hong Kong). Many of the Cantonese dishes in Hong Kong incorporated this sauce. The main ingredient of this sauce is dried scallops, chilli oil, dried shrimps and Chinese ham.
Having traveled to Hong Kong quite a few times, normally I will buy a few bottles from HK airport (note they only sell the premium hotellier XO sauce), although one can get Lee Kum Kee brand as well in HK city.
Try this quick stir fry and I'm sure you'll like it like I do. The prawn is succulent, the pepper crunchy, the dish is colorful and the taste is brilliant.


Stir Fry Prawn in XO sauce
Ingredients
  • 300 gm fresh king prawn ( shelled, de-veined and butterfly)
  • 1/2 tbsp XO sauce
  • 1/2 tsp chilli oil (optional)
  • 1/2 tsp sugar
  • 1 tbsp shaoxing wine/sherry
  • 1 tsp salt
  • 1/2 tbsp corn flour
  • 1/2 green, 1/2 red, 1/2 yellow pepper
  • 2 tbsp cooking oil
  • 2 cloves garlic - minced
  1. Marinate the prawn with salt, wine and corn flour for 15minutes. Keep the juice.
  2. Heat the wok over high heat and add the oil. Add in the pepper and stir fry for a minute and remove from the wok. Then add in the garlic and prawns and stir fry till prawns turn pinkish. This takes about 2-3minutes. Return the peppers into the wok and continue stir fry. Add in the XO sauce and stir fry. Pour in the juice+1 tbsp water so that the sauce will thicken and coat the prawns.
  3. Remove from heat. Served with rice.
DELICIOUS and COLORFUL :-)


Sunday, 19 July 2009

A short break in Athlone, Ireland

Athlone High Street

River Shannon running across Athlone

I've been away for a 3 days short break to Ireland. I've been here in Cambridge exactly 3 years now, but have never step my foot into Ireland before, as the saying goes so near yet so far.
So with my ma around, we decided to pay a visit to our hometown friends in Athlone and also to visit my friends and fellow food blogger so.moo.food in Dublin. The trip was indeed fruitful and load with lots of Malaysian hospitality to name a few. On top of that we're blessed with two days of excellent weather in Athlone (having heard of horrible and unpredictable Irish weather? ) .
If one ever visits Athlone and fancy Chinese food, do drop by Row In Row
( http://www.athlone.ie/athlonedirectory/R/RowinnRowChinese.aspx ) and
Jia Jia Chinese restaurant. If you like a cosy and relax ambience, Row In Row definitely the place to chill out and the food is great. Dining at Jia Jia definitely has its Oriental edge, with the added Oriental decor and huge authentic Oriental arts hanging on the wall, service wise it's excellent and its food definitely authentic. Needless to say, as a food enthusiast myself, I highly recommend this two Chinese restaurant if you happen to be in Athlone.
Back here in Cambridge, I've been growing my own grub in spring. They're faring pretty well now. I've started harvest some of my own vegetables. On my little plot (I would say pots) I have grown some dwarf french bean, potatoes, spring onion, spinach, lettuces and celery. So I've picked some french bean fresh from my plot. :-)
As a Malaysian ( hmnnn.... calling myself half Singaporean as well) , I have yearning for spicy food sometimes. So I decided to make a quick fiery stir fry to go with my rice. If you happen to be in Malaysia and Singapore you couldn't help but noticed some vegetables stir fried in sambal belacan sauce ( spicy shrimp paste ) .... note it's spicy .... but it gives the dish it's added kick. For me it's an excellent Malaysian ingredients after all to bring flavor to other wise a dull dish.


Stir Fry French Bean in Spicy Sambal Sauce
Ingredients (for 2 persons)


  • 150 gm french bean (cleaned and trimmed and cut into 1.5 inches stick)
  • 2 tbsp of olive oil
  • 1 shalots finely chopped
  • 1/2 tbsp sambal belacan sauce
  • 1/2 tsp sugar
  1. Heat oil in a wok till hot. Add in the sambal sauce and shallot and let it brown for a minute.
  2. Then add in the french bean and stir fry on high heat for 2-3minutes.
  3. Then add in sugar and stir fry for another minute or so.
  4. Dish out and serve.
This dish can accompany with rice or usually the Malaysian used it in Nasi Lemak (coconut rice)
My verdict : Delicious

Sunday, 12 July 2009

Pick Your Own (PYO) Strawberries


We went strawberry picking this weekend. Having disappointment over PYO weeks ago
[ reasons being: 1. we went late in the afternoon 2. berries were still developing] , we thought we give it another try. This time around, not only the berries were huge plus juicy and weather were smiling sunshine at us. We went and picked 2 punnets and additional pick and eat along the way. You can't get strawberries fresher than this, right from the plant into your mouth :-) .
Few days ago I was browsing bbc food websites for what's in season, and voila there's a video showing how to make strawberry jam. I decided to make strawberry jam. With strawberry jam then comes the Cornish clotted cream and scones....make the perfect afternoon cream tea.... what a bliss yeah.
For this recipes, I cut down on sugar to 800-850gm instead of 1kg as I prefer my jam to be less sweet. My verdict of this recipes is good. Give it a try. :-)


Sunday, 28 June 2009

Ang Ku Kueh

I'm enjoying every bits of summer..... especially the weather, longer daylight, outdoor activities etc. That could explain for my long disappearing act.
I did cycle 33.7 miles on my Pashley, together with my cycle buddy in search of poppy field. So lovely they were.......

For today, I decided to make ang ku kueh with my mom. Ang Ku Kueh (Hokkien) can be translated as Red Turtle Cake. This is normally served during child's one month old or one year old birthday. I have craving for this kueh ..... frankly speaking I've not had them for almost 2 years now. My sis and I used to visit a kueh shop in Singapore deem to serve the best Ang Ku Kueh.


Ang Ku Kueh
Ingredients (make about 12-15 cakes)

Dough
  • 250 gm glutinous rice flour
  • 100 gm sweet potatoes ( steamed and mashed)
  • 1 tbsp of tapioca flour
  • 2 tbsp of cooking oil (I use corn oil)
  • 2 tbsp sugar
  • 1 tsp red coloring (optional)
  • 150 ml boiling hot water
Filling
  • 250 gm mung bean
  • enough water just to cover the bean
  • 80-100 gm sugar
  • 1/2 tsp of salt
  • 1 tbsp cooking oil
  • Banana leaves cut to the size of the mold for lining
  1. In a mixing bowl, mix the glutinous rice flour, tapioca flour and mashed sweet potatoes. Add in sugar and cooking oil into the flour mixture. Then slowly little by little add in the hot boiling water, using a wooden spatula to mix well. Add in the coloring.
  2. Then use your hand to knead the dough till smooth and non sticky to your hand. If it's too sticky, add in a bit more glutinous rice flour, if it's too dry try add in some water. Let it to rest for 30minutes.
  3. In a pot, bring to boil the mung bean with water. Simmer until bean is soft and ready to be mashed. Drain the water away. Add in sugar , salt and cooking oil and mashed until paste is formed. Let it to cool for awhile.
  4. Line cut banana leaves and lay them onto steamer. Grease with a little cooking oil.
  5. Divide the dough into 12-15 portions. Roll them into balls using your palm. Press each ball down with your palm to form circle about the size of your palm. Scoop 1 tbsp of mung bean paste onto the dough, and wrap the edges and rolled into a ball.
  6. Grease the ang ku kueh mold with some oil. Put the rolled ball into the mold (smooth surface facing the print of the mold) and pressed into it to fit the mold. Then knocked the mold to release the kueh. Place it on the greased banana leaves. Repeat until done.
  7. Heat the steamer, once water is boiling, let the kueh steam for 5 minutes the steamer covered. Remove the cover and let it steam for a further 5-7minutes. This step ensure that the mold print on the ang ku kueh will be retained. Once cooked, remove from the steamer and brush with some oil on the surface. Let it cool down for 10 minutes before serving.

Enjoy.....it's nice ang ku kueh that me and my ma couldn't help ourself with more servings :-)


Sunday, 7 June 2009

Making Pao


This weekend is rather relaxing for me. Mainly because the weather is not that promising for the great outdoor. So I stayed home to experiment recipes which I've not try before or had ''failed'' before.
I browsed through my Hong Kong cookbook for bao recipes. I've failed making bao dough before and that kept me off awhile from trying to make them again. After browsing through internet for some advice on the secret of good & white fluffy bao dough, secrets are to have bleached flour(Hong Kong flour) and baking ammonia(hmnnn....this ammonia I will opt out as some research suggested that ammonia may not be good for the health). Now I understand why the dim sum restaurant had the perfect bao skin. After researching further, there are so many different type of flour for different purposes, the ingredient to distinguish them is the high or low content of protein in the flour. One of the flour for making bao is Hong Kong flour. It is considered bleach flour and has lower content of protein if I'm correct, which gives the bao it white color. I've searched high and low (noted: even to London Chinatown) for Hong Kong flour but still couldn't find them. There is ready made bao flour but at premium prices, instead I opt for multipurpose flour with wheat starch which is more economical and still giving the same texture (except not as white). So what's for the filling......Char Siew ;-)


Char Siew Bao (14-16 , 4 inches bao)
Dough
  • 300 gm plain flour
  • 120 gm wheat starch
  • 90 gm icing sugar
  • 7 gm instant yeast
  • 200ml lukewarm water
  • 20ml vegetable oil
  • 1 tbsp baking powder + 15ml water [ added after dough has been rested for 4-5hrs]
Fillings
  • 300 gm char siew diced
  • 1 big onion finely chopped
  • 1 tbsp hoi sin sauce
  • 1 tbsp roasted sesame seed
  • 1 tbsp vegetable oil
  • 2 tbsp of water
  • 1 tsp of sugar
  • 1/2tsp corn starch with 1 tbsp of water
  1. Sieve the flour, wheat starch, icing sugar into a mixing bowl. Make a whole in the middle and add in yeast, water, oil and stir to mix well. Then use your hand to knead relentlessly until the dough is smooth and non sticky to your hand.
  2. Use a damp cloth to cover the dough and let it to rest for 4-5 hours or at least double in size. Warm temperature aids in dough rising, typically around 28C. For me I let it to rise in my sunroom which is very warm.
  3. While the dough is resting, prepare the filling. Heat a tbsp of cooking oil and fry the onion till fragant. Add in char siew and stir fry for a minute or two. Then add in hoi sin sauce, water amd sesame seed, stir.
  4. Then add in corn starch to thicken the mixture. Heat for another minute or so. Remove from heat and set aside.
  5. Once the dough has double in size give a good knead, mix the baking powder with the water and stir well ( no lumpy residue of baking powder visble). Mix them into the dough and knead again for about 5minutes. Let it to rise for a further 30minutes or so.
  6. Then roll the dough on a work surface duster with some flour. Divide into 14-16 portions. Roll into a ball and flatten with a roller to about 3-4 inches in diameter. Scoop a tbsp of fillings onto the dough and pleat into a bao. Lay it on a parchment paper and place it in bamboo steamer. Continue to wrap the bao until finish. Make sure you leave some space for the bao to expand dring steaming (around 1 inch gap will do) Let it to rest for further 10minutes for it to rise before steaming.
  7. Meanwhile bao is resting, prepare the wok with boiling water. Once it is boiling, place the bao in the steamer and steam for 15minutes. Served while it's piping hot with Chinese tea.
Verdict: My ma says it's quite good .....


And some lovely roses from my garden in June...... Enjoy

Floribunda rose : Birthday Girl

Hybrid tea : Pink rose

Floribunda rose : Princess of Wales

English rose : St. Cecile (the perfume is fantastic)

Sunday, 17 May 2009

Homemade Foochow Rice Wine


Glad that my mum came over for a visit. Weather wise not that great, as it has been really windy and wet this week....unpredictable weather really. Never the less, we still manage to do little of this and that.
On Saturday, we went to farmer's market to buy some local produce. We bought some early carrots, which we then steamed and they tasted so tender and sweet.
Today on the way back from town, we stopped by the local strawberry farm just to check if PYO (pick your own) fruits season has even started......well have to wait for another 2 weeks. However they've early strawberries that they harvested from their farm for sales. Not to bad for 2.3kgs of strawberries for 6 quids. Red, plump, juicy and succulent strawberries , one can only imagine......
eaten with cream............hmnnnnnnn.......


One of the specialities of Foochow dish is chicken cook in homemade rice wine. This dish is commonly served to women in their confinement. It deem to help blood circulation and also heat up the body. I've yearning[note: I by no means in confiment, hehehehe] to have this dish for a year now since I don't even know how to make the wine in the first place. Having my mum here would be an excellent opportunity to learn how to make it. Great!

Cooked glutinous rice

Blended wine biscuit and red rice

Homemade Foochow Rice Wine
Ingredients
  • 1 kilos of glutinous rice
  • water (cover the rice around 1.5inches from rice surface)
  • 1 wine biscuit + 250gm red rice (blend them together)
  • 1 big glass container that can easily fit 3 litres of volume
  1. Cook the glutinous rice in rice cooker. Once cooked, set aside and let it cool.
  2. Once cool, mix the glutinous rice with blended wine biscuit, red rice and scoop it into the glass container.
  3. Seal the container and set aside.
  4. Within 24-48hrs, the fermentation process will begin. Use a clean and dry chopstick to stir and mix after 48hrs. Then after every 2-3days check and stir again.
  5. Then after 30days, the wine is ready for use in cooking.
  6. Please note that the whole process require clean and dry utensils, else it may turn the wine bad and has to be thrown away.
Well keep my finger crossed, I will have rice wine chicken during midsummer :-)


And here May's bloom from my garden, tall lupins and mixed color ranunculus.

Friday, 8 May 2009

In Season


One of the best local grown vegetables in May over here will be asparagus. I call it Best of British asparagus. I love them, be it steam, stir fry, grill, they just taste lovely. So sweet and tender they are. They'll be here for a short while only, hence I tend to had them as much as possible while in season. Half a kilos bunch will set you back of 3-5 quids, but well worth it, loaded with all the antioxidant goodness. [quote : some believes it has aphrodisiac benefits as well]
Today I make stir fry asparagus with garlic and XO sauce. Yum yum .....


Asparagus Stir Fry
Ingredients (3-4persons)
  • 250gm asparagus
  • 2 tbsp olive oil
  • 1/2 tbsp XO sauce
  • 2 cloves garlic -minced
  • 1 small bird eye chilli de-seeded
  • 1/2 tsp sugar
  • 1/2 tsp salt
  1. Clean the asparagus. Trim the end of the stalk. You can use peeler to peel the skin on bottom of the stalk so that tender bit is reveal, rather than discard them. Sliced horizontally at an angle, separate the spears from the stalk.
  2. In a pan, heat the olive oil till hot (with some smoke billowing), throw in the garlic and chilli and stir fry till lightly brown. Put in the stalk and stir fry for 2 minutes. Add in the XO sauce and stir fry for 30 secs. Add in the spears and stir fry for a minute then add in sugar and salt. Stir fry for another 30secs. Removed from heat.
  3. Served hot with rice and other dishes.

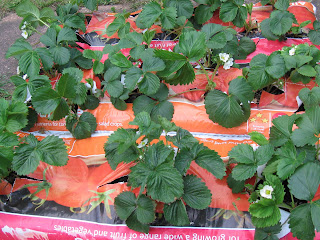
This year I managed to propagate about 20 strawberries plant from last year's runners. So I pot it up onto grow bag and finger crossed it will bear lovely and juiciest homegrown strawberries end June/early July. During credit crunch, it's worth to dig in and grow own veg and fruits, not only is healthy for the pocket, but it will definitely taste so fresh and so good. And at the end of the day sense of achievement to have grown your own.


My strawberry plant in grow bag

Some plants already producing nice flowers, and the fruit is in the making

Monday, 4 May 2009

Chicken Kway Teow Soup


Been doing 34 miles bicycle ride on Saturday, weather was superb. Being May bank holiday this weekend, it was a nice break even though I didn't go anywhere.
So I thought of having a piping hot bowl of chicken Kway Teow soup for breakfast. Light enough to start the day. Back home I could have fresh Kway Teow, here if I'm lucky enough I could find in Chinese shop, else I opt for the dry kway teow in a bag from Vietnam. They taste quite good, but nothing beats the Ipoh fresh Kway Teow.


Chicken Kway Teow Soup
Ingredients (for 2 persons)
  • 700 ml of chicken stock (Boil half chicken in 800ml water, a slice of ginger, one handful of dried anchovy, 1 garlic cloves, 1/2 tsp sesame oil, 1 small cube of rock sugar and 1 tsp of salt for an hour.
  • 100 gm of cooked skinless chicken breast meat - sliced thinly/shredded
  • 100-120gm dry kway teow (Banh Pho)
  • 2 handful of bean sprouts (washed and removed roots)
  • 2 shallots, sliced thinly and fried in 2 tbsp of vegetable oil till brown
  • 1 tbsp of preserved radish/turnip
  • 1 stalk of spring onion chopped finely
  • 1 red chillis thinly sliced
  • a dash of white pepper
  1. In a pot, boil some water to cook the dry kway teow. When water is boilng drop in the kway teow and cook till soft (this takes about 4-5minutes). Drained and divide them into 2 bowls. Blanched the bean sprout and set them on the kway teow.
  2. Bring to boil the chicken stock.
  3. Garnish the kway teow with sliced chicken meat, spring onion, preserved radish and red chillis.
  4. Scoop the soup into the bowl and a dash of white pepper.
  5. Served hot.
Some cut flowers from my spring blooms

White ranunculus, with little blue forget-me-not, little white allium and purple chives flower


This is the real Quuen Of The Night almost black color tulips

Cut tulips Queen Of The Night from my garden nicely wrap as a gift to my friend

Tuesday, 28 April 2009

Sweet Corn Soup


I think this soup is kind of originated from Chinese takeaway in UK. I hardly remembered having this soup back home except in MOS burger outlets. It is actually quite simple to prepare and nice as well.

Sweet Corn Soup
Ingredients (served 2)
  • 500ml chicken stock
  • 1/2 chicken breast meat - diced to small cube
  • 300 gm sweet corn kernel from can
  • 1/2 tsp sesame oil
  • 1 egg lightly beaten
  • 1 tbsp corn starch added with 2 tbsp water
  • white pepper
  • 1/2 tsp of sugar
  • 1 tbsp soya sauce or salt to taste
  • spring onion for garnishing (optional)
  1. Bring to boil the chicken stock, add in sweet corn kernel and chicken meat.
  2. Once chicken meat is cook, quickly add in the sugar, soya sauce, sesame oil and mix well.
  3. Then add the corn starch mix and stir. At this point your soup should be a little thicken.
  4. Add in the beaten egg and stir quickly till egg is cook. Off heat.
  5. Put in a bowl and drizzle some white pepper with spring onion. Served hot.
Here's my Dutch Iris blooming in late April.....

Sunday, 26 April 2009

Saturday in the field


Tell you a secret, I just acquired a classic English bike - Pashley Princess Sovereign. She's such a classic, handbuild in Straford upon Avon. Me and my cycling buddy who happen to have a brand new slick mountain bike Giant R8, we decided to test drive our little new machine. Off we go for 30miles cycle ride through villages around north Cambridgeshire. This time of the year, one couldn't fail to notice the yellow field as far as your eyes could see. Rape seed oil field. Perfect setting for lovely photos. It was indeed splendid.

Tonite I made Oyakodon. This is a Japanese rice with chicken, eggs and onion cooked in dashi stock. Simple, healthy and deliciously in a bowl.


Oyakodon
Ingredients (for 2 persons)

  • 2 chicken breast meat dices in 1 inch cube
  • 1 large onion sliced
  • 3 eggs (lightly beaten)
  • 1 cup Dashi stock
  • 1.5-2 tbsp Kikkoman soya sauce
  • 2 tbsp mirin
  • 1 tbsp caster sugar
  • 1 tbsp sake (optional)
  • 2 bowls of steam Japanese rice
  1. In a pan, add in Dashi stock, soya sauce, mirin and sugar. Bring to a boil. Add in onion and let it simmer on low heat for 5 minutes.
  2. Top the chicken on the onion and let it simmer for 3minutes, turn the chicken over and cook for a furthe 2-3minutes till just cook.
  3. Add in the beaten egg and simmer for further 2 minutes. Don't overcook the eggs, a bit runny will be really nice on the hot steamed rice.
  4. Pour them on top the rice in a bowl. Sprinkle with Japanese chilli flakes.


Monday, 13 April 2009

Salted Eggs


I just had a long weekend break, 4 days in total over the Easter. Really nice once in awhile to have a short break. Good for the body and mind :-).
It's been awhile I last posted any recipes. Fear not, infact about 3 weeks ago I anticipated it'll be Easter soon, so I thought egg dish would serve well, of course not the chocolate Easter egg but rather Chinese salted egg[quote: we don't serve salted eggs for Easter].
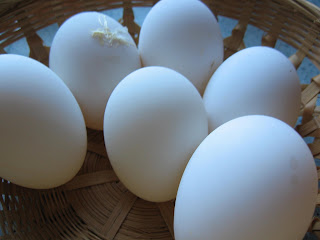
Salted egg is so easy to prepare, the harder part is to source for duck eggs. I seldom see duck eggs on Tesco egg shelf but somehow there are finest duck eggs in front of my eyes. I remembered my mom used to collect lots of duck eggs laid by our free range ducks, enough to start a batch of salted eggs.


Chinese Salted Duck Eggs
Ingredients
  • 6 large duck eggs
  • 400-500gm salt
  • 700ml water
  • 1 glass container for 6 eggs
  1. Boil the water in a pan, once boiling add in 400gm of the salt and stir. Add salt until the solution reached saturation point (meaning any salt added will not dissolved).
  2. Turn off heat and cool the salt solution.
  3. Once cooled, pour the salt solution into the glass container. Add in the eggs. Note that due to the saltiness, the eggs will tend to float. It's important to cover all the eggs in the salt solution. You can leave in a clean cloth on top to immerse the eggs into the solution. Close the glass container and leave it for up to 18-25days.
  4. After that period, you can hard boil the eggs and served with rice porridge.

Sunday, 5 April 2009

Tulips and Magonolia

Begining of April, spring bulbs blossom here and there, especially tulips, one of my favorites. There are many to choose from, be it colors, height, petal's shape and early or late flowering. They're so easy to grow, so far I have yet to have any failures in growing tulips :-), One has to grow them in the autumn to get spectacular display in spring, hence my favorite plant. The only drawback is that one need to lift the bulb after 3years as the flowering quality degrades over the year. But that gives me more reason to buy more new bulbs every year :-) . And tulips make good cut flowers. For tulips lover, one should visit Kuekenhof garden in Holland .
Some of you may go over to Japan to chase cherry blossom, but I'm content with what we've got over here....spectacular Magnolia blossom with sweet fragant. I managed to photograph some magnolia tree in blossom (not in my garden but my neighbor's). :-)
Enjoy the color again from my garden................. oops (some of you may wonder, food blog turning into gardening blog, fear not....I still have lots of recipes to share....just that spring is the busiest month for me in the garden.....always nice to hear neighbors commenting on how nice one garden is :-).

Dwarf white tulips with apricot stripes

Tulips Queen of Night (Apparently not as black as I hoped)

Dwarf Tulips yellow and red stripes-look like a crown

Tulip White Dream
Tulip Red Apeldoorn with Tulip white dream
Giant Tulip Red Apeldoorn
My favorite border of Red Apeldoorn

Spectacular Magnolia

Whole tree full of blossom

Close up shot of Magnolia

Picture almost perfect :-)