Monday 20 February 2012

Sushi

I have cravings for sushi over the weekend and decided to make them. I know I could pop into supermarket  to get those ready made sushi box, but I prefer the taste of home made sushi. Sushi bar or restaurants are gaining popularity into UK food scene, as more people are well aware of healthy  Japanese diet. Making sushi is not that difficult, all you need is a sushi mat (makisu). Nowadays you can get them from big supermarkets that stock up Japanese ingredients. You can make fish sushi, vegetable sushi or even meat based sushi. I find it difficult to source sushi grade raw fish like salmon where I live, so I opt for smoked salmon instead. 
Rice is the most important ingredient in sushi. You can get uncooked sushi rice from supermarkets or oriental shops. They are short grain rice grown in Japan. The first key knowledge is how to cook sushi rice. Let me share with you:

Cooked sushi rice


Sushi Rice
Ingredients (makes about 20 sushi)
  • 250g sushi rice- wash and rinse until water is not cloudy. Then let it soak in water for about 30minutes
  • 325 ml dashi stock
  • 1 tbsp of rice vinegar
  • 1 tsp of sugar
  • 1 tsp of salt
  1. In a small pot, lightly warm the vinegar, add sugar and salt. Stir to dissolve. Do not bring to boil.
  2. Rinse off the rice and place in pot or rice cooker. Pour in the dashi stock and bring to boil and let it cook until the liquid is almost evaporated, turn off the heat and cover for 15minutes. Do not open the lid.
  3. After 15minutes, pour the rice into large shallow bowl and pour the vinegary liquid onto the rice. Use one hand with spatula to mix bu doing cutting stroke, while the other hand will be pre occupied with a fan to cool down the rice as quickly as possible. Cool to room temperature is ideal.
  4. The sushi rice should look shiny and every single grain rice is visible, not a mushy pile....
  5. Once you've master cooking the rice, next step is to roll the sushi.

I will share with you on my next post on how to roll sushi.... stay tuned. Below are just some sushi roll I made on Sunday.


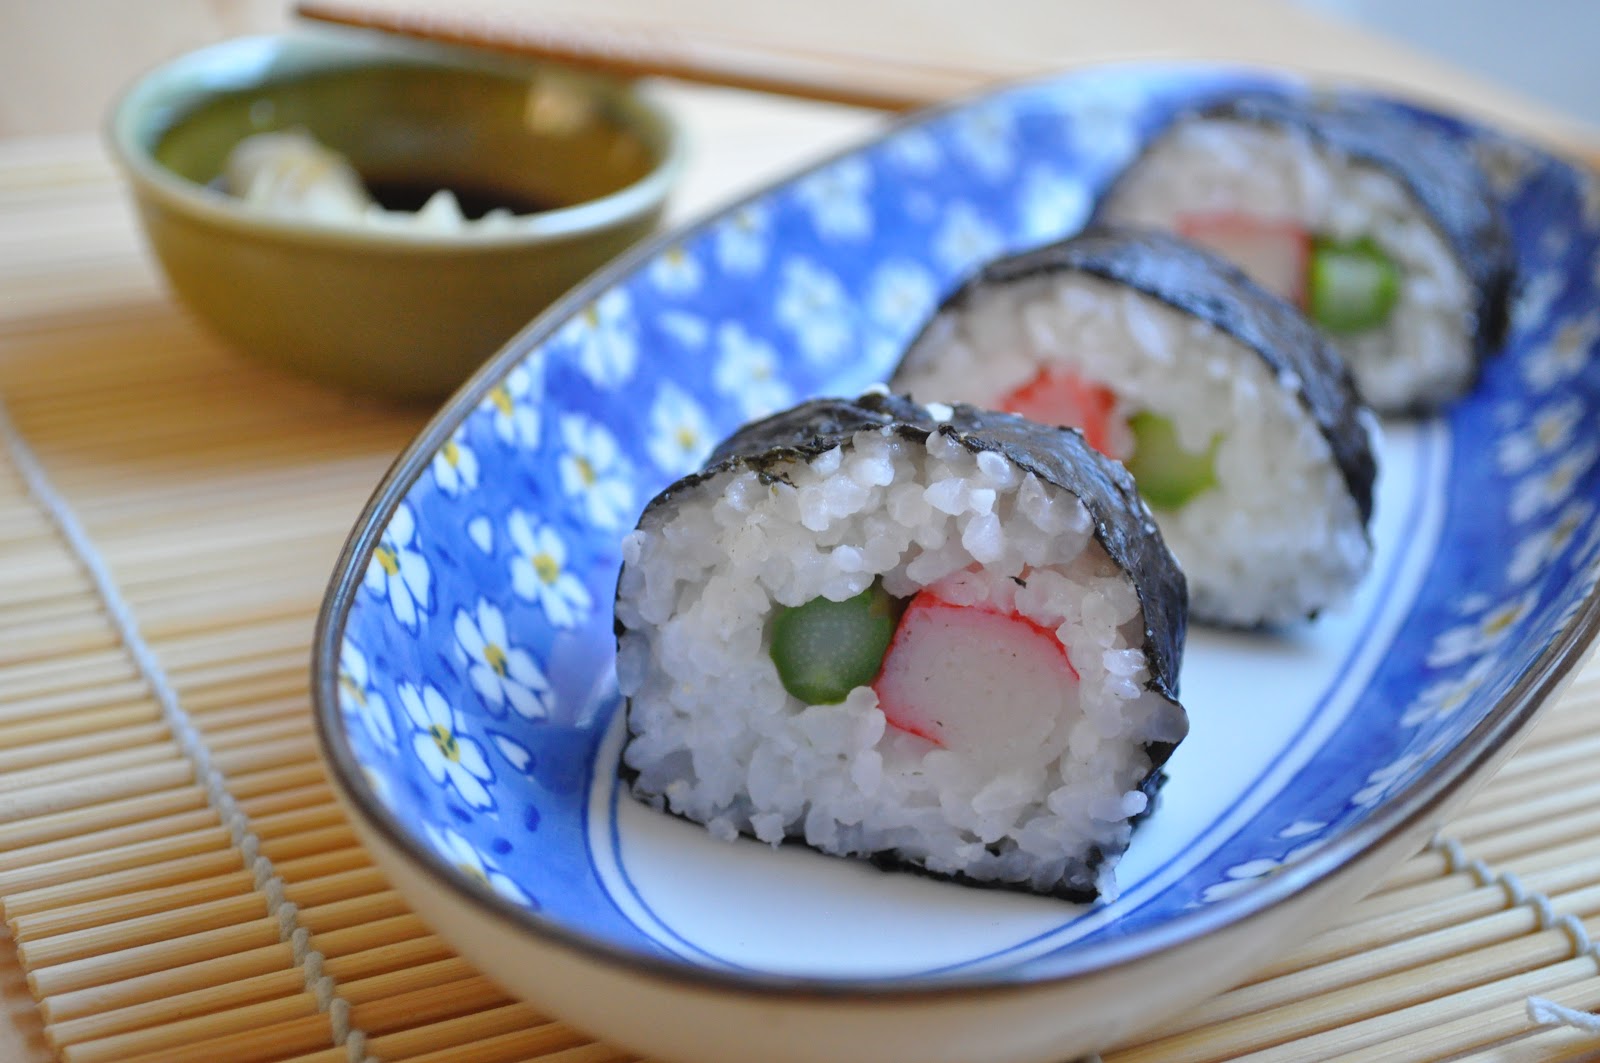
Crab stick+asparagus roll

Chicken cutlet + avocado roll

Smoked Salmon Roll (if only I have really fresh salmon, this will be nigri roll)

Sunday 12 February 2012

Vegetable Tempura

As promised, here I am, posting recipes after a long silence from my blog. I made vegetable tempura for New Year dinner at mine, and my guests like them very much. For those who don't know what tempura is, please check this out. Alright, so now at least you know Japanese tempura are battered and deep fried stuff ( can be vegetable or seafood). Well, the Japanese tempura are light and crispy, and so deliciously good. There are few rules to follow to get it right :

Drying the veg

  1. Do not mix the batter too much-Reason for this is that if you beat your batter the gluten will develop and will make your batter heavy and soggy after frying.  Just use a chopstick and stir lightly/gently. No worry about the flour not mixing well or there is lump in the batter. Believe me, this texture will give you the  lightest and crispiest tempura.
  2. Few things that need to be cold (I mean icy cold). Please use icy cold water for mixing the flour. Normally I also tend to put my mixing bowl and flour in the freezer before I start mixing my batter.Prepare some ice cubes too in case you're preparing it in warm environment.
  3. Ensure that your ingredients for frying ( ie vegetables and seafood) is as dry as possible (note: not de-hydrated ) . Normally I will cut the vegetable and pat them dry with kitchen towel and leave to dry on wire rack at least 4 hours before I fry them. 
  4. Use a frying pan that can retain heat and distribute heat well. Cast iron pan or copper based pan is ideal. As the batter is icy cold, the ability to retain the heat of the oil throughout frying is essential to get that light crispy texture.
  5. Don't try to be impatient and drop all your items into the frying oil at one go. This will cause the temperature of the frying oil to drop and you'll end up with soggy tempura. Some of you may ask , how do I test if my oil is hot enough for frying? Drop a trickle of batter into the hot oil, if it's hot enough, the batter will float immediately. I normally fry 3 items only at one go to ensure that the temperature remain constant.
  6. Once your item is in the frying pan, you don't have to interfere with  it, just let it fry and float in the hot oil for a minute or two until golden brown, then just flip once....done.
  7. Remember to drain off the excess oil once the item is out from the pan. Use oil absorbing paper to drain.
  8. Make a small batch, so that they will always taste fresh and crispy once you served them.
With these tips in mind, you'll be back for more tempura I promise.

The batter, I drop in some ice cubes to keep it icy cold

Vegetable Tempura
Ingredients (4 portions as starters)


Crispy vegetable tempura


French bean tempura


  • 16 French bean (trimmed)
  • 4 slices of aubergines (5mm thick)
  • 1 medium Pepper-can be green, red, yellow, orange. Cut into bite size
  • 4 slices of sweet potatoes (5mm thick)
  • 3 tbsp self raising flour
  • 1 tbsp corn flour
  • 1 cup of icy cold water
  • Few ice cubes(optional)
  • 1 litre of vegetable cooking oil
  1. Sift the flour ( self raising+corn flour) into the mixing bowl.
  2. Pour the oil into the pan and heat on medium heat.
  3. Make a hole in the middle of the flour, pour the icy water into the hole. Gently use a pair of chopstick and lightly mix the flour. Don't worry if it's lumpy and doesn't look very well mix. The less you mix the better it is. 
  4. Check if the oil is ready for frying. (Remember the tip)
  5. Coat your item with batter and drop it into the hot oil. I coat French bean in a pair and consider it an item. Fry three items at one go. 
  6. Fry for 1 minute or two until lightly golden and flip over for another minute. Drain.
  7. Continue until done.
  8. Served while it's piping hot with dipping sauce (dashi stock+soy sauce+mirin+sugar)
Crispy French bean tempura
And believe it or not, it was  minus 12deg C on Saturday over here early in the morning. Very cold but absolutely stunning scenery.....Frosted and frozen in time. I went for a walk in the morning and got these pictures.

The row of trees got frosted

Beautiful scenery

Sunday 5 February 2012

It's Snowing

Hello to all my readers again. I am totally absorbed by so many good TV programmes on BBC lately. Sherlock Holmes Series 2 was one of them. Then the starting of Master Chef series got me glue to the box too.
Apart of being a TV addict, hosted New Year and Chinese New Year dinner at mine. I will post some recipes soon.
Yue Sheng I prepared for CNY

From weather front, it's been pretty mild since Dec until last week when the cold Siberia air swept across Europe. Bet you all have heard the harsh condition in Eastern Europe with many homeless people die of hypothermia. We haven't have proper snow since this winter compared to last. However last evening, we have at least 6 inches or more of snow. And I woke up to a wintry scene...so beautiful. Arm with camera and wellies, I went for a wintry walk around my village to snap the lovely scenery. Enjoy....


Mr Snowman in my garden

Lots of snow

Icicle forming on my hose pipe

Sea  of white


Saturday 24 December 2011

Merry Christmas to all


Classic minced Pies - a Christmas tradition  in Britain

Another last minute Christmas bake, the classic minced pies. This is traditionally served as sweet pastry during the festive season in UK. The history of this little minced pies dated back to the 13th century. Detail can be found here. Again I took some short cut, buying store bought pre-prepared luxury mincemeat.
So I better start baking to bring some over to my friend's for Christmas Eve dinner this evening...

Minced Pies
Ingredients


Bought the mincemeat from Mark & Spencer  


  • 1 jar of high quality mincemeat (around 350g)
  • 200g plain flour
  • 40g icing sugar
  • 75g ground almond
  • 125g butter (unsalted)
  • 1 egg lightly beaten
  • Some milk for glaze
  • Zest of 1 orange
  • Adding zest of 1 orange to the mincemeat

  1.  Lightly butter a 12-hole pie or patty tin. Tip the mincemeat into a bowl and mixed in the zest of 1 orange. Set aside
  2. Place the flour, sugar, almonds and butter in a mixing bowl. Use rub in method by hand until they resemble breadcrumbs. Add in the egg and mixed well . Bring the mixture together with your hands, wrap in clingfilm and chill for an hour or so.
  3.  Thinly roll out the pastry on a floured surface. Cut out 12 circles with a fluted pastry cutter, large enough to fill the base of the prepared tin. Press gently into each hole, then fill with the mincemeat.Cut out another 12 slightly smaller discs and use to cover the mincemeat. Press the edges together to seal. Make a small slit in the top of each, then brush lightly with milk. 
  4. Chill for about 30 minutes. Meanwhile, preheat the oven to 180C (fan assisted).
  5. Bake the pies for 20 minutes until golden brown. Remove to a wire rack and serve warm
Filling the mincemeat into pastry 
Out from oven-still bubbling hot

Flaky short crust pastry with the lovely mincemeat....yummy


So I wish all my readers Merry Christmas, enjoy the holidays. Enjoy the minced pies with some mulled wine.

The end result....ready to go...


Friday 23 December 2011

Classic Christmas Fruit Cake

Classic Christmas Fruit Cake
 
With the Christmas festivities just around the corner (to be precise in 2 days time), I must be honest, I haven't done much really in the baking department. I was planning to bake Christmas fruit cake back in October but my procrastination takes the better of me. Two weeks ago I was grocery shopping and noticed on the shelf they stock ''Christmas fruit cake ingredients in a bag'' for 3 quid only.  The instructions on the bag seems easy to follow, so without hesitation I bought one. What an excellent deal! 
So my quest for baking perfect Christmas fruit cake begin..... so what's in the bag :
  1. 2 kgs of mix dried fruits[sultanas, raisins, candied orange peel, glaced cherries etc]  pre-soaked in brandy (luxurious)
  2. 275 g brown sugar
  3. 225 g plain flour
  4. 1 tsp mixed spice
  5. 50g chopped almonds
  6. 1 tbsp black treacle
  7. 1 sheet of marzipan (which I discard)
  8. 200 icing sugar (which I discard)
  9. 1 tbsp of apricot jam (which I discard)
The other ingredients which I have to supplement are 4 eggs, 210g butter, zest of 1 orange and 1 lemon. And of course some brandy to feed the cake every 2 weeks.... 
This classic cake can easily be stored up to 4 months...

The ingredients


Method

  1. Pre-heat the oven to 120C (fan assisted). Prepare a 18cm round  baking tin. Cut out double layer of parchment paper to line the base and side of the tin. Also cut out a double layer as cover for the top.
  2. In a mixing bowl, cream the butter and brown sugar until creamy. 
  3. Then beat the 4 eggs lightly and pour the eggs slowly and continue to mix. Do not pour the egg all at once to prevent curdling of the mixture. If this happen, just dust the mixture with some flour and continue to mix.
  4. Then add lemon zest, orange zest, black treacle,  mixed spice, chopped almond and dried fruit. Carefully fold in. Mixed well.
  5. Then fold in the flour and mix. Pour into the baking tin and level carefully. Cover the top with parchment paper.
  6. Bake the cake for 4 - 4.5 hours on the lowest shelf.
  7. After 4-4.5hours, remove cake from oven and let it cool in the tin for an hour.
  8. Once cool, use a skewer/little knife to prick the cake, feed brandy into the cake.
  9. Use new parchment paper to wrap the cake and a tin foil to wrap in and store in air tight cake tin.
Enjoy the cake and Merry Christmas.........

The mixture

Ready to go into the oven


Luxurious fruit cake

Sunday 23 October 2011

An autumn project

I've just been asked to join an allotment plot near my home. Basically, allotment is a plot of land which can be rented to grow vegetables and fruits. Allotment had grown so popular in UK that waiting list to get one may be subjected to at least 2 years on the waiting list. Due to the fact that my garden at home is dedicated to beautiful plants, there leave not much space for growing edible vegetables and fruits. The yearly rental are almost neglible, imagine £5 for 100m2 plot. Of course the plot is not in it tip top condition as previous tenants left it in dire state laden with perennial weeds and crouch grass. So over the sunny weekend, making use of the best of autumn weather I went digging in my plot. As I am not a keen user of chemical weed killer, I will only use eco friendly method - dig in and eradicate the weeds. Yes hardwork indeed but I believe it will be lovely come next  summer - enjoying fresh produce from allotment and try to be self sustaining if possible. I met a few allotmenteers there and they seem to be very helpful and giving encouragement for a newbie like me. 
Clearing half of my plot

Two weeks ago, a friend of mine gave me a bag of fresh sweet chestnut. Instead of just roasting and boiling and eating them, I thought I could give a try on Mont Blanc desserts. Well-I believe after you have seen the picture of my Mont Blanc, many will advise me to go for classes to improve on my cream piping skill. My excuse will be, I don't have the right tools but at least I make an effort to do everything from scratch...... :-)

Mont Blanc-I need more praticing on piping the chestnut puree

Mont Blanc
Ingredients (make 7 pieces)

Genoese Sponge Cake

Genoese Sponge Cake
  • 3 eggs
  • 75 g caster sugar
  • 1 tsp vanilla essence
  • 65 g plain flour
  • 1 tbsp corn flour
  • 40 g butter, melted and cooled
  1. Set the oven to 180C. Grease and base a cake tin (8 inch square tin). 
  2. Place the eggs, essence vanilla and sugar in a heatproof bowl and set over large saucepan of hot water. Whisk until very thick and pale, and firm enough to leave a ribbon trail. This will take 6-7mins using electric mixer at medium speed. Remove from the heat and continue whisking until cool.
  3. Sift the flour and corn flour together. Gradually fold half into the whisked mixture using large metal spoon.
  4. Gradually fold in the melted butter alternately with the remaining flour mixture, using as light touch as possible or the cake will sink and the cake will be heavy.
  5. Pour into tin and bake for about 25-30mins. The cake should be well risen, firm to the touch and just beginning to shrink away from the sides of the tin.
  6. Leave to cool in the tin for about 3 minutes, then turn out on a wire rack to cool completely.
  7. Cut the cake into round shape
  8. Use a ring cutter to cut the cake into round shape. 

Tips: Genoese sponge is a very light sponge that keeps well, providing a good base for decorated special occasion cake. Add the butter very gradually in a slow thin trickle to avoid making the cake heavy.

Homemade chestnut puree

Chestnut Puree
  • 350 gm peeled chestnut
  • 1 tbsp caster sugar
  • enough water to cover the chestnut
  1. In a small pot, place the chestnut, sugar and enough water to cover them.
  2. Cook over medium heat for around 20mins until soft.
  3. Drain and keep the sugary water.
  4. Put the chestnut into a food processor and pour in half of the sugary water and blend until it resembles puree. 
  5. You can pass through the puree through a seive if you desire a really smooth consistency but I must warn you, it's not an easy task. I would rather divide into small portion and mash any remaining bits. 
  6. Set aside for assembling.

Chestnut Cream
Chestnut cream
  • 3/4 cup of double cream
  • 1 tbsp of icing sugar
  • 2 tbsp chestnut puree from above
  • 1 tbsp rum/brandy
  • 1/2 tsp vanilla essence
  1. Put the mixing bowl in fridge to cool it first for 30minutes. This helps during the whisking stage.
  2. Bring out the mixing bowl, pour in the cream and icing sugar and whisk.
  3. Whisk until there is ribbon consistency, add in brandy/rum, chestnut puree and vanilla essence.
  4. Continue to whisk for 2 minutes on medium speed until firm. Do not over whisk as the cream will curdle.
  5. Then assemble the cake. Pipe the chestnut cream onto the cake. Repeat until done. Then pipe the puree over the cream using spaghetti tip piping(I need to find this tip). 

I went over to friend for lunch and contributed this little piece of delights.

Saturday 1 October 2011

Mini Summer Fruit Tarts with Creme Patisserie


How time flies, it's officially October now. At least I'm still enjoying the warm weather here, it's been a very sunny and warm (26-29C) week, so make the best of it. Very unusual really for this time of the year.


I had been busy (quoted : enjoying it ) throughout this summer, been going places, doing London to Cambridge cycle ride, a number of social occasions-BBQ, punting, etc, and highlight being able to meet up with Ann & Tim over in London.


I'm back here again to give some TLC to my desserted blog [sincere apology to my readers] . Where to start..... of course it'll be about food. I baked some mini summer fruit tarts yesterday to bring to work for a good cause - The Big Coffee Morning in support of the MacMillan Cancer Support fundraising event. I am happy that I put my baking skill for a good cause.


Mini Summer Fruit Tarts

Ingredients (makes around 15-16 tarts)


Pate Sucree (Sweet pastry)


  • 175 gm cake flour


  • 75 gm ground almond


  • 100 gm butter


  • 75 gm icing sugar


  • pinch of salt


  • 2 egg yolks


Creme Patisserie


  • 300 ml of milk


  • 3 large egg yolks


  • 50 gm sugar


  • 2 tbsp flour


  • 2 tbsp corn flour


  • 1 tsp vanilla essence


  1. For the pate sucree, in a mixing bowl sieve the flour and icing sugar, then add in ground almond and salt. Rub in the butter with flour until it resembles bread crumb.


  2. Whisk the yolk lightly and slowly add into the dry mixtures. Use a spoon to roughly mix. Form the dough using the cling film method.


  3. On a work surface, lay it with cling film ( roughly about 40cm x 30cm ) . Then pour (2) onto the cling film, then wrap the cling film around it to form a dough ball. Then put into the fridge and let it rest for 1-2hrs. Meanwhile you can prepare creme patisserie.


  4. Beat in 3 egg yolks and sugar into a heat proof dish. Whisk the yolk and sugar together, then slowly add in the flour and corn flour to form a paste, then add in the vanilla essence. Meanwhile heat the milk just until it start to foam, then slowly add in the milk to egg mixture and continue to whisk.


  5. Then cook this mixture over low heat, take care to continue whisking all the time. The liquids will start to thickens, off the heat once the consistency you desired is achieved.


  6. Let it to cool. to ensure there are no thick layers form on the surface, drop in just a bit of butter on the surface, and use a cling film to cover the surface. This creme patisserie can be kept in the fridge for up to 3 days.


  7. Now back to pate sucree. Lightly oil the muffin baking tray. Take out the dough from fridge. Unseal the cling film wrap, use another cling film to cover the top of the dough. use a rolling pin and roll the dough to about 3mm thickness. If the dough is soft due to heat from surrounding, put it back to fridge to let it set for anothe half an hour, so that it'll be easier to cut and shape later on.


  8. Use a 3inch round cutter, cut the pastry and place it onto the individual muffin baking cup. Shape nicely the tart in the cup. Continue until done. Use a fork to poke holes on the bottom of the tart. It is very important to bake blind the pastry. Basically I warp small pouches of uncooked rice/bean in cling film and fill the hole in each tart. This will ensure the baked tart retain it shape during baking and baked evenly. You can put the tart into the fridge to rest for another 20minutes. Meanwhile heat the oven to 180C.


  9. Bake for around 12-15mins until golden brown. Remove from oven and let it cool. Once cool the tart cases can be removed easily from the muffin tin. To serve fill the tart with a tbsp of creme patisserie and top with fruits-strawberry, kiwis, raspberry, blueberries, mangoes, peaches...the choice is endless :-). You can glaze the fruits with light sugary syrup(this is optional)


As long as baking is done with ingredients of joy and love, any tarts will turn out lovely. :-)

Monday 8 August 2011

In search of perfect scones


One of my favorite past time is enjoying cream tea on weekend be it in quaint tea room or over at friends or in the privacy of my own garden during summer. It's quintessential part of the British way of life, enjoying a really nice brew and an ordinary plain looking scone (or must I emphasize it got to be 2 scones) top with clotted cream and homemade strawberry jam. Heavenly......


There are several useful tips on getting a good or almost perfect scones. But before I jumped on the recipes, let me give you a know-how and understand your ingredients and techniques that make a real different to the end results.
  1. Self raising flour is preferred as it has raising agents mixed into it. Sift the flour to add air into it so that the final product is lighter.
  2. Additional raising agents is required be it bicarbonate of soda, baking powder or cream of tartar. These raising agents produce light textures to the scones. It is important to be accurate when measuring them out. Baking powder is a ready made mixture of bicarbonate soda and cream of tartar. When liquid is added the baking powder reacts and produces carbon dioxide, and the heat of the oven expands these gas bubbles to give the airy texture. Bicarbonate of soda is a raising agent with gentler effect. Using of bicarbonate of soda must be measured accurately as too much of this ingredient will give a bitter aftertaste. Whereas cream of tartar is a fast acting raising agent, it begins to work the moment it is in touch with liquid. Always bake the mixture as soon as possible after adding cream of tartar or its effect will be reduced. I tend to use baking powder + additional cream of tartar to give a lighter texture, it's all about how tall your scone will rise.
  3. Dried fruits like sultanas and raisins benefit from initial soaking in orange juice or alcohol, i.e brandy, rum, sherry. I tend to soak the dried fruits overnight to plump them up. I also tend to gently pat dry the fruits with kitchen towel prior to be added into my baking.
  4. Do not overwork the dough. A few gentle knead to form a rough round ball will do. Then gently pat down to desired heights with fingertips, no rolling pin requires.
  5. Use a ring cutter to cut the scones, try not to twist it when you cut. I tend to use a quick and fast movement to cut through the dough so as to avoid twisting.
  6. A pre-heated oven is mandatory, so that the raising agent is put to work immediately and give that lovely light texture. I tend to use fan assisted oven mode as it circulate the hot air around evenly and heat up very quickly.
English Scones
Recipes (make 6)
  • 250 gm self raising flour
  • 60 gm chilled unsalted butter
  • 1 tsp of baking powder
  • 1 tsp of cream of tartar
  • 150 ml whole milk or buttermilk (the choice is yours)
  • 1 tbsp of caster sugar
  • one handful of raisin
  • 1 small egg beaten + 2 tbsp of milk for eggwash
  1. Preheat the oven to 200C (fan assisted)
  2. In a mixing bowl, sift in the flour, baking powder and cream of tartar.
  3. Using rub in method, rub in the butter with flour mixture wit fingertips until it resembles breadcrumb.
  4. Add in raisin to the flour mixture, then slowly add the milk to the mixture and gently knead with your fingertip and palm to form rough round ball. Dust some flour on work surface.
  5. Put the dough on the work surface and gently pat the dough to required heights with finger tips (2.5 cm).
  6. Use a cutter and cut the dough. Place the scone on baking tray. Assembled the remaining dough, cut and repeat until done. Brush the scone with egg wash.
  7. Bake for 12 minutes until lightly browned and cooked. Bring out and cooled on rack for 5 minutes before serving. Serve with clotted cream and strawberry jam.


Summer cut flowers from my garden to adorn my desk at work

Taking care of Jerry for a week as owner is out on holiday

Monday 25 July 2011

Stir Fry Minced Beef with Pointed Sweet Red Pepper and Black Bean Sauce


How time flies. It's been quite awhile since I last updated my blog. I've been busy, first I've family members over visiting in month of June, followed by lots of travelling during the weekend, workload, friend visiting from the north and finally on my mission to study life in the UK test. Not only have I negelected my blog, my garden has been slightly neglected too. It's all about priority :-) .
I promised myself to bake cake, one of those few favorite things that I love to do during summer, went and bought all the ingredients and yet they sat in the pantry untouch for the last 3 weeks. Perhaps procrastination perceeded priority in my case.
Well no cake recipes this time around but I still have simple stir fry recipes to try out.


Minced Beef Stir Fry with Sweet Pointed Red Pepper and Black Bean Sauce
Ingredients (serves 2)


  • 250gm minced beef


  • 1 large pointed red sweet pepper


  • 1 thumb size ginger-finely chopped


  • 1 clove garlic-finely chopped


  • 1 tbsp sesame oil


  • 1 tsp sugar


  • 1 tbsp black bean sauce


  • 1/2 tbsp vegetable cooking oil


  • 1 tbsp shaoxing wine
    2-3 tbsp water


  1. Heat 1 tbsp of sesame oil in a wok/pan on medium heat. Once hot, add the minced ginger and browned slightly. Then add in the minced beef and give a good stir fry for 2-3 minutes. Add shaoxing wine and stir fry another minute. Remove from wok and set aside.


  2. Using the same wok, heat 1/2 tbsp of vegetable cooking oil, add in minced garlic and slightly browned. Add in the sweet pepper and give a good stir fry for a minute. Add black bean sauce, sugar and water and bring to simmering point.


  3. Pour back the minced beef and give a good stir and coat. Off the heat. Serve it hot over piping hot steam rice.


Garden a bit unkempt-on the wild side


My first harvest of runner bean-easy to grow, and taste great when stir fry


Last year I only have 5 fruits, this year my green gage is doing extremely well


My harvest of greengage from the garden


Jerry will only pose for the camera if I'm doing string trick


Lush in July, sit back and relax


Saturday 7 May 2011

Xiao Long Bao (Steamed soup dumpling)


I like making little snacks but I always shy away from making xiao long bao. Yes, I love eating them very much especially when I'm away in Taiwan or back in Singapore. Of course Ding Tai Fung serves good xiao long bao but for the authentic version one can find in Nanxiang xiao long bao in Shanghai. One fine day I hope .......


So here I am in my first attempt on making xiao long bao.....

Xiao Long Bao

Ingredients


Soup Jelly
4 cups of water
6 chicken wings


  • 5 dried scallops-soak till sot

  • 2 spring onion

  • 1 knob of ginger, smashed

  • 3 cloves of garlic-smashed

  • 1 tbsp of gelatin powder
    Bring to boil all the above ingredients (except gealtin powder). Once boiling, turn the heat to low and let it simmer for 2hrs. Off the fire.


  1. Sieve the boiling liquid into a bowl. Then stir in the gelatin powder, mix well so that it's not lumpy.


  2. Pour the liquid into a plate and let it to cool in fridge until it sets. Then cut into cube.


Filling


  • 500 gm of mince pork

  • 100 gm prawn-finely chopped

  • 4 spring onion-finely chopped

  • 3 tbsp soya sauce

  • 1 tsp of white pepper

  • 1 tbsp shaoxing wine

  • 1 tsp sesame oil

  • 1 tsp sugar


  1. Mixed all the ingredients, also add in the cut soup jelly. Mixed well. Set aside in the fridge until you're ready to wrap the xiao long bao.

Skin


  • 3 cups plain flour

  • 1 cup boiling water

  • 1 tsp vegetable oil

  • 4 tbsp cold water


  1. In a large mixing bowl, put in the flour. Pour in the boiling water, use a chopstick and continue to stir vigorously.

  2. Then add in the vegetable oil and cold water, use your hand to knead the dough. The dough should feel sticky. Continue to knead for about 5minutes into a soft dough. Cover with a damp kitchen towel and let it rest for 30minutes.

  3. Lay the bamboo steamer with either napa cabbage leaves or iceberg lettuce leaves.

  4. Divide the dough into 4 equal portions. Take 1 portion and roll into a long log. Then divide the log into 14 pieces.

  5. Dust the work surface with flour, use a rolling pin and roll each piece into 3inches circle. For wrapping, the thinner the edges the easier it will be for pleating later.

  6. Scoop 1 tbsp of filling onto the skin wrapper, and start to pleat. Continue until you're done with all the fillings. You can learn how to pleat from this video.

  7. Place the dumplings onto the steamer and steam for around 10-12minutes.


The flavors are there but I still need to improve the quality of the skin......


a