Tuesday 28 October 2008

Say Cheese


Having difficulty to smile? Say Cheese, yes I say cheese please. Maybe my treats of little cheesy tarts could make you smiley for Tuesday and rest of the week.
Introducing Blueberry Cheese Tart. Enjoy this simple recipes, and you'll be smiling away I promise.


Blueberry Cheese Tart

Ingredients ( 10-12 tarts)
Puff Pastry
  • Use the pastry recipes from my apple tartlets
  • or get the ready made Just Roll puff pastry
Cheese fillings
  • 125gm cottage cheese
  • 40gm sugar
  • 40ml milk
  • 1tsp vanilla essence
  • 2 tbsp sour cream
  • 1 egg
  • 1 tbsp flour+a pinch of baking powder
  • 6 tsp of blueberry jam
  1. For pastry, roll out on a flat working surface to a thickness of around 3mm. Use a pastry cutter ring to cut out in circle. Use appopriate size so that it fits your muffin tins. Fill the tin with cut pastry. Put into fridge until you need it.
  2. For the cheese fillings, mix together the cottage cheese and sugar. This step is crucial as the cheese is in lumpy curd. You have to ensure the cheese and sugar are mixed well and the mix should be smooth. If it's too lumpy the filling will not be able to rise nicely during baking. The trick is to let the cottage cheese at room temperature(25C) and it's more easy to work with later on. Else you can use food processor to blend them well. Add in milk,egg, sour cream and vanilla and stir well. Make sure the mix is smooth.
  3. Fill up the puff pastry with cheese filling to 3/4 full. Fill the rest of puff pastries. Drop in 1/2 tsp of blueberry jam into each filled puff pastries.
  4. Turn oven on 180C, and bake for 20-25mins till cook.
  5. Ready to serve with a cup of English breakfast tea.


Saturday 25 October 2008

Fancy MOS technology?

As most of my semiconductor friends might be wondering why I posted "fancy MOS?" technology on a Saturday. Hmnnn.... haven't she had enough of Vt, Idsat, Ioff and more of Moore's law during the weekdays? Well, well, it's not about microelectronics but rather chicken teriyaki rice burger from MOS burger(Japanese fast food chain). It's a pity that over in UK I can't find any MOS burger outlet. One of the unique burger bun in MOS burger is actually made of sticky rice. The rice bun is slightly toasted on both side, bringing a slight crisp on the outside and soft and moist on the inside. The bun goes really well with teriyaki chicken, few lettuce green and a dollop of Japanese mayonnaise. This rice bun, I called uniquely MOS burger technology. This is my first attempt in making the rice burger bun and it turned out really well, ahem, I must say even better than what you get from MOS burger.


Chicken Teriyaki Rice Burger

Ingredients (good for 2 burgers)

Teriyaki chicken
  • Half the ingredients from my teriyaki chicken recipes
  • some lettuce green
  • some Japanese mayonnaise
Rice Burger Bun
  • 1 cup of glutonous rice
  • 1 1/4 cup water
  • 1 tsp salt
  • 1/2 tbsp of cooking oil
  • 1 tbsp of cooking oil for toasting rice burger
  • Some vegetable oil for hand lubrication on hand molding the rice
  1. For Rice Burger, soak the glutinous rice overnite. Prepare a steamer, steam the glutinous rice with 1 1/4 cup of water for approximately 30-40mins till cook. You can use microwave but I find that steaming is better. After steaming, add in 1/2 tsp oil and salt, stir well and let to cool.
  2. Oil your palm and fingers with cooking oil, so that when you work on the sticky rice it won't stick to your hands. Take one tbsp of sticky rice and roll into a ball, then flatten it to about 1cm thick, with your hand press gently to compact it. Leave on a plate. Continue with the rest.
  3. Heat a non stick pan on low heat, brush with oil, once heated, place the rice burger onto the pan and let it toast till brown on one side, and turn to toast on the other side. Once ready place it on a plate, garnish with lettuce green, a piece of teriyaki chicken fillet and a dollop of mayonnaise.
Enjoy the different kind of burger bun. I did, I know one of my UK friend will be so envy of me now. :-)

Rice burger bun ready for toasting

Yummy

After making my lunch, I went out to my garden to harvest crysanthemum, loads of them. Better pruned them as the strong wind might damage the foliage. So I've got a scissor and pruned myself a vaseful of mum.
Pretty mum
Fake Van Gogh sunflower ?

It's been awhile since I last reorganised my kitchen cabinet. One started to realise one has so many hidden treasures that was forgotten. In my case some nice wines especially Inniskillin Ice Wine. Totally forgotten I did hide it in some corner of my kitchen cabinet. Then having to reorganise my western spices, Asian spices, tea/coffee/chocolates, and sauces cabinet. Aren't you impressed? :-)


My treasures.....wine


My tea/coffee/chocolates cabinet

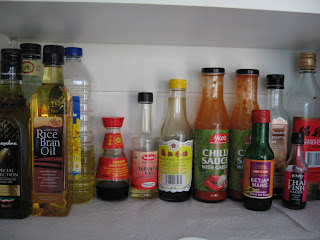
My sauces/oil cabinet

Spices cabinet

Friday 24 October 2008

My Comfort Food


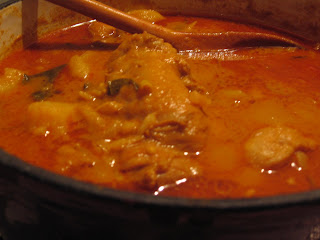
Finally I officially cooked something in my new cast iron pot. So versatile, so robust, so heat savvy and am sure it will be my favorite cookware. Investing a pot that could last me years and years itself already paid for the non lasting cookwares I had before. Some might wonder what did I cook in it. How about Malaysian chicken curry. The distinctive Malaysian chicken curry is signifies by the use of potatoes, lemon grass, kaffir lime leaves, candlenut (buah keras) and specially mixed curry powder. This is what I call comfort food for autumn.


Malaysian chicken curry (Kari Ayam)

Ingredients
  • 6 pcs whole chicken leg(cut 3 pc each)
  • 1 can coconut milk(400ml)
  • 300 ml water
  • 3-4 pc kaffir lime leaves
  • 1 lemongrass stalk
  • 4 tbsp Malaysian Adabi Chicken Meat Curry Powder
  • 2 candlenut/buah keras crushed
  • 2 shallots finely chopped
  • 1 big onion finely chopped
  • 2 slices of ginger, finely chopped
  • 2 chillis finely chopped
  • 4 big potatoes, peeled and cubed
  • 2 tbsp sugar
  • 2 tbsp salt
  • 4 tbsp cooking oil
  1. Wash and cut whole chicken leg,drain and set aside.
  2. In a pot, boiled the potatoes, just about to cook, drained and set aside.
  3. Add 4 tbsp of coconut milk to the curry powder to form paste and set aside.
  4. Heat slowly the cast iron pot, once heated, add in shallots, ginger, onion, chillis, lemongrass, kaffir lime leaves and fry for awhile till lightly brown and fragrant. Then add in the curry paste and stir. Add in chicken and stir fry for 2-3minutes.
  5. Then pour in the remaining coconut milk and stir, remember to slowly simmer and not on high heat as this will cause the coconut milk to curdle. Add in potatoes, sugar, salt, candlenut and let it simmer for 25minutes. By this time the potatoes has soften and some might have dissolved into the gravy and thicken. If you find it too thick, add in the water.
  6. Served with rice, prata, naan, or even noodles.
With this big pot of curry it's gonna last me for 3 meals :-) . Yummy. Brrrrrp.......

Wednesday 22 October 2008

Guessing Game


We went out during lunch time to Science Park for our usual walk to unwind. It was a perfect blue sky and weather was nicely cool at 15C. This time of the year the walk is pleasant as the autumn color display in it's hue of golden brown, amber red and hinge of yellow everywhere. Well get the picture. One of the tree with it's fruit caught our attention, we were debating it's some kind of fruit, yes some kind of fruit. Mind giving a shot at guessing what it is? No prize for the winner though. It definitely look lovely for my photography prop I think:-) .


Tonite, I'm not going to make any specific dish using that yellow fruit. But feeling rather nostalgic about a dish my mom used to make for us. It's simple to prepare and handy to eat apart from being a deep fried dish. Well, well ...... I do eat healthily most of the time, right? Yes I am going to make Malaysian prawn fritter.


Malaysian Prawn Fritter

Ingredients(good for 2 persons)

  • 1/2 cup corn flour
  • 1/4 cup rice flour
  • 1/2 tsp tumeric powder for color
  • 1 egg
  • 1/2 tsp salt
  • 250gm king prawn, peeled & deveined
  • 3 tbsp of water
  • oil for deep frying
  1. Mix the flour, salt, tumeric powder, egg, water to make batter.
  2. Dip the prawn into the batter.
  3. Heat a wok, or fryer , pour in cooking oil and heat it.
  4. Once hot, drop a little batter, it should be frying, elseit's not ready Once it ready, put the batter coated prawn into the oil and fry till golden brown.
  5. Dish out and served with ketchup or sweet chilli sauce.

Tuesday 21 October 2008

My Rice Bowl


Rice is considered the staple food for most Asians. When one speaks about rice bowl, it signifies the basic element required to live, which is related to ones employment. I must have rice at least twice a week, else I would think something amiss. Well called it psycology :-) .
So this evening am introducing my staple food.....RICE. The recipes I'm gonna show you is:

Premium King Prawn Fried Rice.


Ingredients (good for 2 persons)
  • 100gm fresh king prawns peeled
  • 1 cup rice cooked and left overnight
  • 1 red pepper bell
  • 2 shallots
  • 3 cloves garlic
  • 1 chilli sliced
  • 60gm spring onion finey chopped
  • 5 cabbage leaves thinly sliced into strip
  • 1 1/2 tbsp premium XO sauce
  • 2 eggs lightly beaten
  • a dash of white/black pepper
  • 1 tbsp of soy sauce
  • 3 tbsp vegetable oil
  • 1/2 tbsp sesame oil
  1. Heat a wok, pour in the 1 tbsp vegetable oil, once heated, add in garlic, shallots light fry till brown, add in chilli, pepper bell , cabbage and prawn and stir fry till prawn turned pinkish red. Removed from wok.
  2. Pour in 2 tbsp vegetable oil in the wok and let it heat. Once heated, add in XO sauce and stir fry till fragant. Pour in the rice and stir fry for 2 minutes, add in the beaten egg and continue to stir fry. Followed by spring onion and stir fry for a minute, then add in (1) , pepper, sesame oil, soya sauce and stir thoroughly for a minute or so.
  3. Ready to dish out and serve.
Your guests will give you a thumbs up for this rice dish. Please do not take my rice bowl away from me :-)

Monday 20 October 2008

Fiery Flame of Hell

What is too spicy? I defined it as when my mouth is on fire. I must admit my spicy compliance level has mellowed quite a bit since I came to UK. Tonite I have craving for fiery spicy dish. Each fiery meal is a flavorful banquet, each spicy dish is a savory treat, if ones agree. Aubergine plus chilli paste makes fantastic meal that I called fiery flames from hell.
Aubergine/Egg plant/Brinjal as most commonly known is suitable for all kind of savory dish, like in curries, spicy stir fry and etc. Hope you like this meal, calling all fanatical chilli-heads.

Spicy Aubergine

Ingredients (good for 2 persons)
  • 500 gm aubergine cut length wise 2 inches each
  • 1 chillis
  • 2 shallots coarsely sliced
  • 5 cloves garlic coarsely chopped
  • 2 tbsp pure chilli paste
  • 1 tbsp shaoxing wine/dry sherry
  • 1/2 tbsp tomato ketchup
  • 1 tbsp light soya sauce
  • 2 tbsp cooking oil
  • 1 tbsp sesame oil
  1. Steam the aubergine in a steamer for 30minutes, this is to soften the aubergine so that you reduced the amount of cooking oil used. If you do not want to steam, you have to stir fry with 5tbsp of oil instead of 3tbsp of oil eventually.
  2. In a wok, heat cooking oil+sesame oil, once hot, put in the garlic, shallot, chilli and stir fry till brown. Add in the chilli paste and stir fry for a minute.
  3. Then add in the steamed aubergine and continue to stir fry for at least 5 minutes till soft. Add in soya sauce, shaoxing wine and tomato ketchup. This add a hint of sweetness to the spicy dish.
  4. Dish up and serve with rice.
My tongue burning with flame, fiery flame of hell. Enjoy.

Sunday 19 October 2008

Sinfully Bliss the French way

I was just flipping my TV remote control on a lazy Saturday morning having just returned from Holland the nite before. Saturday Kitchen, a cooking programme was on at BBC. One of the invited chef was famous patissier, Michel Roux. The thought of French desserts were simply sinfully bliss. I had the chance to be based in France for 3 mois before. All those nice pastries, tartlets, cream eclairs and so forth. Oh dear, oh dear, oh dear ..........
So I continued watching him making the pastry, especially the puff like pastry(this is quite a skill actually). And he used simple ingredients to churn out something so beautiful and tempting. The recipes called for apple and passion fruit. However, I have hard time searching for passion fruit in supermarket, therefore I settled for apple and kiwi fruit instead. So I thought, I'm gonna make them for apron's delight Sunday Kitchen ala Francais. Apology as I didn't quite make a lot of photography,as they tasted so good once out from the oven.


Apple and passion fruit tartlets

Ingredients [good for 6, 5 inches tartlets)

For the rough puff pastry
250g/9oz plain flour, plus extra for dusting
250g/9oz very cold butter, cut into small cubes
½ tsp salt
125ml/4½fl oz ice cold water
For the crème pâtissière
3 free-range egg yolks
120g/5oz caster sugar
20g/¾oz plain flour
250ml/9fl oz milk
½ vanilla pod, split lengthways
1 tbsp icing sugar
3 medium Cox apples, peeled and thinly sliced
3 passionfruit, pulp and seeds scraped out, to serve

Method
  1. For the rough puff pastry, place the flour in a mound onto a clean work surface and make a deep well in the centre using your fingers.
  2. Place the butter cubes and salt into the well and, using the fingertips of one hand, work the ingredients together, gradually drawing more flour into the well with the other hand and working that in until the mixture is loosely but well combined and still with lumps of butter visible.
  3. Gradually add the iced water and mix until fully incorporated in the mixture. (You may not need all of the water. Take care not to overwork the mixture.)
  4. Roll the dough into a ball, wrap it in cling film and chill it for 20 minutes.
  5. When the dough has chilled, roll it out onto a lightly floured work surface into a 40cm x 20cm/16in x 8in rectangle. Fold the rectangle into three and give it a quarter turn.
  6. Repeat the process, giving the folded pastry another quarter turn.
  7. Wrap the pastry in cling film and chill for a further 30 minutes.
  8. When the dough has chilled, roll it out, as before, onto a lightly floured work surface into a 40cm x 20cm/16in x 8in rectangle. Fold the rectangle into three and give it a quarter turn.
  9. Repeat the process, as before, giving the folded pastry another quarter turn (making a total of four turns).
  10. Wrap the pastry in cling film and refrigerate for at least 30 minutes.
  11. For the crème pâtissière, in a bowl, whisk the egg yolks and 20g/¾oz of the caster sugar together to a ribbon consistency.
  12. Gradually whisk in the flour until smooth and well combined.
  13. In a saucepan, bring the milk, 40g/1½oz of the sugar and the vanilla pod to the boil. As soon as the mixture starts to boil, gradually pour the hot milk mixture onto the egg yolk mixture, stirring continuously.
  14. Return the mixture to the pan and bring to the boil again, whisking continuously. Simmer for 1-2 minutes, then remove from the heat and transfer the mixture to a bowl.
  15. Dust the crème pâtissière with a layer of icing sugar to prevent a skin from forming as it cools. (Once cool, the mixture can be kept in the fridge for up to three days. Remove the vanilla pod before using.)
  16. Preheat the oven to 180C/350F/Gas 4.
  17. Roll the rough puff pastry out onto a lightly floured surface to a 2mm/eighth of an inch thickness. Cut out six discs using a 12cm/5in pastry cutter.
  18. Brush a baking sheet with a little cold water and transfer each of the pastry discs onto it using a palette knife. Chill the pastry in the fridge for 20 minutes. Prick the pastry discs several times with a fork.
  19. Spread equal amounts of the crème pâtissière mixture evenly onto each of the pastry discs, leaving a narrow margin free at the edge of each pastry disc.
  20. Arrange the apple slices in a fan on top of the crème pâtissière mixture, starting in the centre of each disc and working outwards to the edges.
  21. Transfer the tartlets to the oven and bake for 15-18 minutes, or until the pastry has risen and is pale golden-brown. Sprinkle generously with the remaining 60g/2½oz of caster sugar, then return to the oven and cook for a further 4-5 minutes, or until the sugar has caramelised.
  22. Remove the tartlets from the oven and immediately transfer them to a wire rack, using a palette knife. Set aside to cool.
  23. To serve, place one of the cooled tartlets onto each of six serving plates and spoon over equal quantities of the passionfruit pulp.
Sinfully Bliss The French Way....... ooh...la..la

For those who are not keen on making the puff pastry, can always get the ready made puff pastry from the supermarket, in UK supermarket you'll find Just Roll 350gm ready rolled puff pastry.

Recipes courtesy of BBC.

Saturday 18 October 2008

Foot that travel places

Some of you might wonder whether why there is no new posting from me for the last few days. Reason is I am out of town on work. Where to? some might ask.
When I checked my passport, infact I have lost count of the entry stamps into Schipol airport. Yes I am in Holland again, yes AGAIN. At least this time around I have some time at hand to make a little trip around Amsterdam before heading to region of Twente for my official appointment.


We head to Zaanse Schans for a taste of gouda cheese, colorful clog and the good ole windmill. Of course being a keen gardener, no trip to Holland will be complete without heading to Amsterdam floating flower market or Bloemmarkt, haven for tulip & speciality bulbs. Another sight that will probably caught your attention, seeing so many cyclists Amsterdam, I've not seen any European capitals that has as many cyclists here. All the way bikey Amsterdam.


What's for meal in Amsterdam? You'll find many places offering falafel, the Holland chips(eaten with mayo the Dutch way), Asian- Chinese, Thai and of course the fame Indonesian food. We settled for Indonesian food, out of the many dishes on the rice table, only one I find to my liking which is chicken cook with Balinese sauce.
After dinner, one should check out the many coffee shop joint, well they look a bit dingy and we decided not to go in. So head eastward to Twente for work trip.

What a bliss to start Saturday morning with what I brought back from Holland, Gouda's Gilde Siroop Wafelen with a cup of Darjelling tea.

Tuesday 14 October 2008

The older , the spicier


姜是老的辣 (Jiang1 shi4 lao3de la4.). Wonder whether some of you have come across this Chinese proverb, it means the older the ginger the spicier it gets. It symbolizes the older you get the more life experiences you acquired. I have much to learn from people with greater life experiences.

Tonite I am going to introduce to you a homely Chinese dish. Stir fry chicken/pork with ginger and spring onion. One of the key ingredient is old ginger, the older it is the spicier you'll get.

Stir fry chicken/pork with ginger and spring onion

Ingredients
[good for 2 persons]
  • 200 gm pork loin/chicken breast (sliced into pieces)
  • 120 gm spring onion (cut into 2-inch length, separate the white part from the green part)
  • 50 gm old ginger (peeled off the skin with peeler and shred thinly)
  • 1 tbsp sesame oil
  • 1 tbsp vegetable oil
  • 1/2 tbsp shaoxing wine
  • 1/4 tsp sugar
  • 1 tbsp light soya sauce/ or salt to taste
Marinating ingredients
  • 1 tbsp sesame oil
  • 1 tbsp light soya sauce
  • 1 tbsp shaoxing wine
  • 1/2 tbsp corn flour
  1. Marinate the chicken/pork pieces with marinating ingredients. Set aside for 15-20 minutes.
  2. Heat up your pan and pour the sesame oil and cooking oil. When the pan gets very hot and begins to smoke, add in the ginger and stir for a few seconds, then add in the chicken/pork pieces and continue to stir fry for one minute. Add in the white part of the spring onion and continue to stir fry for another minute. Just when the chicken/pork pieces start to cook, add in shaoxing wine, sugar and light soya sauce and stir fry, off the heat and throw in the remaining green part of the spring onion and stir for 30seconds, in this case you'll get crunchy green bit rather than soggy spring onion.
  3. Remove and serve hot with steamed white rice.
Enjoy the wise saying of a young ginger trying to be an old ginger :-)

Monday 13 October 2008

The Dip Truth


I find this is so true: "Whatever the situation there is always a dish to suit".
The start of the week one will always need some gearing up especially when we just had a wonderful weather over the weekend. Having a lot of meat for the past week, I prefer to have something really light and yet nutritious(something as close to superfood) for my evening supper. One will never go wrong with fresh fruits or vegetables. Going through my fridge I realised I have a large avocado which I intended to eat yesterday but forgotten. Could I whip up something nice with avocado? Scratching my head for ideas it seems.
How about making a nice avocado dip to serve with bread stick? Sound really easy, almost close to no effort at all. And avocado contained good cholestrol, bet you will ask for more for this light and hearty meal. It is also good as starter when entertaining guests.


Avocado Dip

Ingredients [good for 2 persons]

  • 1 large ripe avocado
  • juice of half lemon
  • 2 cloves garlic
  • a pinch of sea salt / or to taste
  • 1 tbsp olive oil
  1. Cut the avocado in half lengthways and twist the 2 halves in opposite direction to separate. De-stone.
  2. Scoop the avocado flesh into a non-metallic bowl. Squeeze over lemon juice and pour in the olive oil. Use a masher to mash the flesh into desired consistency, add in sea salt and mix well.
  3. Scoop into a little bowl and serve with bread stick or even naan bread.
Tip: Don't keep the dip for too long as it may oxidize and discolor. Always prepare it just before guests arrived and have it soon after.

This is simply gorgeous [quick and easy meal yet loaded with nutritions].


Sunday 12 October 2008

Blur Like Sotong


Sotong in Malay means squid. As the Singlish (Singaporean English) term, "blur like sotong" used to denote someone who is inept or in a world of his own, in short muddle headed. I wonder has anyone of you had been in this situation before, as blur as the sotong. I tend to be "blur like sotong" when it concerns my bicycle key.
Tonight posting is about sotong recipes hence the title. Not to worry as one had this dish one will not be muddle headed rather will sing lyrical on this Blur Like Sotong recipes. I created this with a hint of Thai touch. I like Thai cooking as it calls for lot of fresh ingredients. Thai cuisines to me will always be rated second to none.

Hope you like it as well.

Grilled Squid stuffed with minced meat with Thai dressing

Ingredients
(Good for 2 persons)
  • 6 medium squids-about 5 inches in body length (washed and cleaned)
  • 3 toothpicks broken into 2.
  • half cucumber(about 150gm)-shredded/ or green young mango /or young papaya
  • 1/2 tbsp olive oil
Marinating ingredients for squid
  • 1 tbsp lemon zest
  • 1 tbsp olive oil
  • a pinch of sea salt
  • 1/2 tbsp ground black pepper/ground white pepper
  • 1/2 tsp tumeric ( optional - to give nice color to squid)
  • handful of coriander
  • handful of parsley
  • basil leaves (optional)
Fillings
  • 100gm minced chicken/pork
  • 1 tsp salt
  • handful of corriander chopped
  • 1 tbsp white pepper
  • 1 tbsp cooking oil
Sauce
  • 1 lemon grass stalk finely chopped.
  • 1 shallot, corsely chopped
  • 1 tbsp honey
  • 2 tbsp lime juice
  • 2 cloves garlic finely chopped
  • 1 tsp nam phla (fish sauce)
  • 1 pinch of sea salt
  • 1 tsp olive oil
  • handful corrander coarsely chopped
  • handful parsley coarsely chopped
  • few basil leaves coarsely chopped
  1. Marinate squid with the marinating ingredients, let to rest for at least half an hour.
  2. Prepare the fillings, mixed the ingredients for filling and let it rest for half and hour.
  3. Prepare the Thai dressing. Mixed the ingredient for sauce and set it aside.
  4. Scoop a tbsp of filling and stuffed the inner tube of the squid, stuff 3/4 full, and use a toothpick to sew up the top. Do the rest.
  5. On a heated pan, lightly greased with 1/2 tbsp cooking oil, once is hot, put in the squid and let it seared 2 mins on each side.
  6. Then baste it with the remaining marinating juice & transfer it to oven and grilled for further 8 minutes at 200C.
  7. Don't over cooked squid as it will feel rubbery and tough. Removed when it's cooked.
  8. Place the shredded cucumber on a plate, then the grilled squid and drizzle with the sauce. Served with fragant Thai rice.
Can I have second serving please!

Note: If you don't want the stuffing, just pan grilled it for around 3-4mins each side, and dress it with Thai sauce, really tasty.

Saturday 11 October 2008

Yum Cha at 46

I have yet to find any yum cha (Chinese tea drinking) restaurant in Cambridge that do dim sum for brunch. Being rather an international place, I sometimes find it difficult to find authentic Chinese Asian cuisine here. Of course according to one of my "Ang Moh" friend, the best for value Chinese restaurant is none other than Jin Ling which is next to Corn Exchange in Cambridge city centre. I agree on the portion but as in the quality ( just so so). Thank goodness London is just an hour away by train, which to me primarily has much greater varieties, and secondly they cater to my South East Asian tastebud at a reasonable price. I always try to avoid "eat all you can" Chinese buffet as the foods there are really crap.
Having said that, I'm not that desperate enough to head down to Chinatown in London yet. Being able to prepare some authentic dim sum myself, I'm gonna made Loh Mai Kai [Glutinous Rice with chicken] and Guo Tie [potsticker] before the Saturday morning cycle ride. As usual, my cycle buddy has been chosen to be my homemade dim sum cuisine guinea pig. Homely invitation to : Yum Cha@46


Guo Tie ( Pot Sticker)


Guo Tie (Pot Sticker)

Ingredients
(Good for making 12 pieces of guo tie, 2 persons)

Guo Tie Skin
  • 50 gm of flour
  • 25 ml water
  • 1/2 tsp salt
  • 2 tsp cooking oil
Fillings
  • 150 gm minced pork
  • 1 tbsp shaoxing wine or dry sherry
  • 2 tbsp light soya sauce
  • 1 1/2 tbsp sesame oil
  • 50 gm spring onion, finely chopped
  • 1/2 tbsp ginger juice (optional)
  1. Prepare the filling. Put the minced pork in a bowl, add soya sauce, shaoxing wine, sesame oil, ginger juice and spring onion. Use a spoon to mix well and let it to marinate for at least 2 hours.
  2. Prepare the skin, in amixing bowl pour in the flour, salt, then add water and oil. Knead well for about 5 minutes until it doesn't stick to your finger. If it's too dry, wet your hand with some water and knead, if it's too wet, dust your hand with flour and knead. Let it to rest for 15mins.
  3. Roll the dough into long cylinder, divide into 12 little pieces of dough. Using a rolling pin , roll each pieces to form round skin of 3 inches in diameter, not too thick and not too thin.
  4. On each skin, place a tbsp of fillings. Wrap and stick the edges, if you fancy you can plait it, if you're lazy like me I chose the former.
  5. On a pan, lightly grease thinly with vegetable oil(roughly abot 1/2tbsp), on medium heat. Once heated place the guo tie into the pan(depending how big your pan is, mine able to accomodate 15 pieces at one go), brown on both side by turning them over. Once browned, pour some water(about 100ml) into the pan to let it steam cook, cover with lid, and lower the fire. Cook for 5mins until the liquid is dry, using a spatula try to lighly scrape the guo tie from the pan.
  6. Serve with black vinegar (Chinkiang vinegar) and some ginger shread.
The skin is so easy to make, no need to run down to Chinese store to get gyoza wrapper. I prefer to do everything by scratch.

Note: If you want to keep it to cook later, make sure you dust enough flour to the guo tie else it will stick to the container and the skin will break. I prefer to make it and cook it immediately.


Loh Mai Kai


Loh Mai Kai (Glutinuos Rice with chicken)

Ingredients
(Good for making 4 little bowl, for 4 persons)

  • 250g glutinous rice
  • 2 cups water
  • 100g chicken meat
  • 50g lean pork meat
  • 1 Chinese sausage (lap cheong), thinly sliced
  • 10g black Chinese mushrooms, soaked and cut into thin slices
  • 5 shallots, sliced
Seasoning (A):
  • 1 tsp light soy sauce
  • 1 tsp sesame oil
  • 1 tsp oyster sauce(optional)
  • 1 tsp ginger juice
  • 1 tsp sugar
  • 1/4 tsp pepper
  • 1/4 tsp salt
  • 1/2 tsp Shaoxing wine
  • 1/2 tsp dark soy sauce
  • 1 tsp oil
  • 1 tsp cornflour
Seasoning (B):
  • 1 1/2 tsp light soy sauce
  • 1 tsp pepper
  • 1 tsp sugar
  • 1/2 tsp salt
  • 2 Tbsp oil
  • 1 tsp sesame oil
  • 1 tsp dark soy sauce
  • 1/2 tsp Chinese five spice powder(I tend to use 1 tbsp, more fragant)

Method
Wash glutinous rice, then soak it for two to three hours. Steam it for 30 minutes.

Cut chicken and pork meat into slices. Marinate with seasoning (A) for about one to two hours.

Heat oil in a wok and saute shallots till fragrant. Add mushroom slices and stir fry quickly then dish up. Add cooked glutinous rice and seasoning (B) and water. Stir fry well for five minutes.

Grease four medium-size rice bowls. Add some fried shallots and mushroom slices, a few slices of Chinese sausages and seasoned chicken and pork slices. Fill up with glutinous rice and press down with a ladle.

Steam for 30-40 minutes. Turn over the rice bowl onto a plate and serve Loh Mai Kai with chilli sauce.

P/S: This recipes I downloaded from Kuali. I tried and it's really good.

By the way, we finished everything that's served on the table..... a sign of budding chef in the making :-) .

Yummy.... please, please don't drool over the nice pictures of my food. :-)

Friday 10 October 2008

Rocket Rocks!

Define rocket?
  1. According to Wikipedia it is a missile, aircraft or other vehicle which obtains thrust by the reaction of the rocket to the ejection of fast moving fluid from a rocket engine.
  2. To Malaysians it can be the symbol of the opposition political party - DAP [Democratic Action Party]
  3. To a chef rocket can be a type of green salad better known as roquette or Arugula.
Fear not as I am not here to preach anything at all about rocket science. But more or less trying to create a starter that rocks. Real easy to make and in no time your guests will be rocking away about your rocket.


Rocket salad with grape fruit on large flat mushroom

[good for 4 persons]
Ingredients
  • 4 large flat mushroom
  • 50gm of fresh rocket
  • 2 tbsp extra virgin olive oil for rocket
  • 1 tbsp extra virgin olive oil for drizzling on mushroom
  • 1 tbsp garlic infused olive oil for plate decoration (optional)
  • 1 tsp of lemon juice
  • 1 tsp balsamic vinegar
  • 1/4 tsp of sea salt
  • 2 tbsp of peeled grapefruit flesh
  • 1/2 tsp honey
  1. Wash and dry the mushroom, remove the center stalk.
  2. Lay them on a baking tray, drizzle some olive oil onto the inner cup of mushroom.
  3. Meanwhile prepare salad, mix well olive oil, lemon juice, balsamic vinegar, honey & salt. Pour the mixture onto rocket and grapefruit flesh. Coat well.
  4. Bake the mushroom at 190C for 8minutes and removed from oven. On a plate drizzle some garlic infused olive oil, place mushroom cup on the plate and top it up with salad. You can also drizzle some black pepper if you like.
  5. Ready to serve.
For sure Rocket Rocks!

I was eyeing cast iron cookware for awhile now and finally it's half price. Therefore without hesitation I bought a 22cm casserole cast iron pot, in burgundy red. Nice :-).

Thursday 9 October 2008

Get the party started


It was interesting conversation over lunch at work a week ago. One of my colleague pointed out that she had difficulties organizing meal for her vegetarian friends. Therefore she decided not to invite them for that matter. A little effort I thought to myself and you will be bowed over.
I never ceased to amaze my guests whenever I served the Italian antipasto(or better known as starter). One of them, I highly recommended is bruschetta. It is so easy to prepare and I guaranteed that your meat eating guests and vegetarian friends alike will be bowed over.

I picked some cherry tomatoes, fresh parsley and basil from my garden, bought a French loaf, extra virgin olive oil from my kitchen cabinet and I'm ready to shine again.

Bruschetta

Ingredients

Good for 4 persons

  • 8 inches long French loaf
  • 300gm cherry tomatoes
  • 1 tsp lemon juice
  • a pinch of sea salt
  • a handful of fresh parsley, coarsely chopped
  • 4 basil leaves, coarsely chopped
  • 5 cloves toasted garlic , finely chopped
  • 2 tbsp extra virgin olive oil for the bread
  • 2 tbsp extra virgin olive oil for the tomatoes
  1. Sliced the round bottom of the loaf at both end, discard them. Then sliced the loaf horizontally with each thickness of about 1.5cm. Coat one surface of the bread with olive oil and lay the non coated surface onto the baking tray.
  2. De-seed the tomatoes and cut into small cubes. Add the lemon juice, salt, garlic,parsley, basil, olive oil and mixed them.
  3. Turn on oven grill, to 200C, place the bread and toast for 5minutes until golden brown. Removed from oven.
  4. Then scoop the tomatoes onto the toasted bread.
  5. Served in a lovely plate and have them while it's still hot.
Simple isn't it? It's not difficult to get the party started at all, a glass of wine and bruschetta, perfect isn't it?

Note: For toasted garlic, just throw in garlic cloves still in their skin and let it grilled for 10mins. Removed form oven and peeled off the skin.

Wednesday 8 October 2008

Have you had your green today?


As you would have noticed and wondered whether my diet had any greens in it. Most of my postings has yet to sing praises of the humble natures best gift to us, vegetables, vegetables and more vegetables. Fret not, as I do eat healthily all the time, ahem, most of the time to be technically correct. :-)
For the past few days I had my fair share of meat & seafood, so I thought healthily, I should go green tonite. I always had emergency vegetables in my fridge, those that can be easily kept fresh for at least a week in my definition. Greens like cabbage & celery will find their little cozy corner in my veg box all the time. I like my vegetables cooked and one of my favorite cooking style is stir fry.
So be it, stir fry celery for tonite. When I was young, I disliked raw celery because they tasted awful and also quite tough especially the stalk. I always thought celery could be classified as certain kind of herb due to it's taste and will only be used as garnishing to my knowledge, how wrong I was.
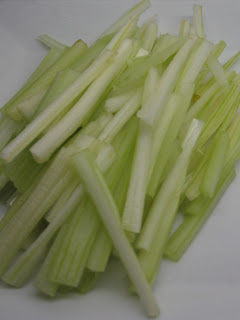
Sometime last year I saw a friend of mine preparing celery, she diligently peeled off the skin on the stalk and cut them length wise into thin strip before stir frying them. I tried them and they tasted so good, so tender and yet so crunchy[I simply love this simple stir fry]. I've read that celery cut length wise tasted much better than cut horizontally. Reason for stripping the skin, is that all the fibrous string will be removed and revealed the juicy tenderness of the flesh. I fall in love all over again with celery.........


Stir Fry Celery

Ingredients
Good for 2 persons
  • 200 gm celery stalk
  • 2 tbsp cooking oil
  • 2 cloves of garlic, coarsely chopped
  • 1 tbsp shaoxing wine/ dry sherry
  • 1/2 tsp sugar
  • a pinch of sea salt or 2 tsp light soya sauce
  • 1/2 tsp of sesame oil
  • drizzle of Japanese chilli flakes (optional)
  1. Peeled the celery skin and cut length wise into thin strip
  2. Heat vegetable oil in wok/pan on high fire. Once heated, put in garlic and lightly browned.
  3. Throw the celery in and stir fry quickly for 1 minute on high fire.
  4. Pour in shaoxing wine, sesame oil, salt and sugar and stir fry for another one minute.
  5. Turn off the heat. Serve on a plate and drizzle with chilli flakes(optional)
Served with rice.


Am definitely feeling more healthy now.
And to end the nite on high note of healthy eating, I wouldn't deny any offer on autumn straws. Yummy.

Tuesday 7 October 2008

Three nites in a row

Allowed me to get over with my food affiliation with mussels once and for all[temporary by the way] . I guessed some of you might start to wonder if my cooking repertoire is limited to only of mussels of this and mussels of that. Three nites in a row and still not fed up? Honest confession: a little bit actually....... :-)

So I made something light and simple. Pasta fettucine, mussels in wine sauce.


Pasta Fettucine, mussels in wine sauce.(good for 2 persons)

Ingredients

  • 50gm de-shelled mussels
  • 150gm fresh fettucine
  • 5 tbsp mussels stock (I saved it from my moules recipes)
  • 2 tbsp extra virgin olive oil
  • 4 pieces garlic, roasted, and coarsely chopped
  • drizzle of dry thyme
  • drizzle of dry chilli flakes
  • 1/2 red pepperbell, coarsely chopped.
  • a pinch of sea salt
  • 1/2 glass white wine
  • one bundle of fresh parsley ,coarsely chopped
  • basil leaves
  1. Cooked fresh fettucine in a pot. Cook till al-dante. Drained.
  2. In a pan, heat olive oil, put in the garlic and lightly browned it. Then put in the mussels and lightly stir fry, throw in the pepperbell and continue to fry.
  3. Pour in the white wine, mussel stocks and let it simmer for 3 minutes.
  4. Add in the pasta and let it coat with the sauce.
  5. Add in salt, thyme, parsley. Off the heat.
  6. Ready to serve in plate. Decorate it with drizzle of chilli flakes and basil leave.
Light and nice.

Monday 6 October 2008

The Ugly or The Beauty?

Am reporting to you how I go about analysing the farmed mussels vs the picked mussels. Please bear with my mussels obsession at the moment. :-)
One obvious differences, those farmed mussels has pretty looking shell while those picked ones are mainly covered with barnicles.


Again I didn't demean the picked ones, just because they look less appealing to their cultured cousins. From texture wise, both are as succulent, however the picked one tend to have sand and grit.
Therefore feeling a little bit pity of their not so good looking nature[even Gordon Ramsay may disapprove of their ugly looking shell as deco for his plate I am sure], I created a nice looking simple seafood starter for the picked mussels. All you need, a little effort to turn the ugly into a piece of beauty.


Mussels boat with tartare sauce.

Ingredients

  • 50gm de-shelled mussels from yesterday leftover.
  • half medium red pepperbell
  • lime juice
  • 1 tsp tartare sauce
  • lemon for decoration
  1. put the cooked mussels into the halved pepperbell.
  2. drizzle the mussels with lime juice
  3. put the sauce on a lemon ring for dipping.
Simple and enjoy.

To The Wash


As promised for those who diligently tuned in for this post about mussel picking at The Wash.
Weather was crap when we set out from Cambridge. All I could hope is rain rain please go away, and come back another day. Going mussel picking in the rain would really spoil the fun. However my friend and his daughter ain't bother by the miserable weather.

"What to bring Checklist":
  1. bucket[checked],
  2. rubber boots[checked],
  3. hot tea [checked],
  4. cinnamon roll [checked],
  5. fruits[checked].
All checked and green to go.

It was dull, as it pouring down all the way for the 1hour and 20minutes drive to Hunstanton waterfront. It is a typical British seaside town dotted with "Fish & Chip" takeaways & restaurants. As my friend puts it , the trip to seaside town must be complimented by the traditional fish & chip meal. Takeaway fish & chip is not my favorite as it is laden with greasy oils and high calorie counts. Well after all tradition calls for that....we settled for national dish of Britain. Big chunk of battered cod and soggy chips in salt and vinegar. Disappointment.

At least on the bright side, weather is clearing up and sign of a good weather is just around the corner. After the meal, we decided to buy some fresh mussels from fishing villages along The Wash. To Brancaster we went and bought about 4 kilos of fresh sea farmed mussels[counting that we may not be able to pick any] and lo and behold there's even fresh oysters on sales. We bought 4 fresh oysters. Mussels bought, another half and hour to go before the low tide, so we drove back to Hunstanton beach to do the mussel picking. Yes indeed, there were mussels aplenty, most of them covered with barnicles. My friend's daughter was happily picking away meanwhile I was happily photographing. As it turned out to be clear blue sky against the white chalk cliff of Hunstanton beach, scenic and perfect for photography. Instead of mussel picking I was more keen on posing :-) [partly because I knew that I have enough mussels to last me for a whole week].

As it turned out to be quite an enjoyable trip to the beach despite the earlier downpour. Count one's blessing aye.
After an hour at the beach we decided to head back to Cambridge. I am looking forward to cook mussels at my friend's place. His wife was so surprised that we managed to bring back so many mussels. So be it, continental fare as the French puts it ''Moules Marinières", mussels in white wine, garlic and butter sauce. Simple yet delicious. Next came the technically difficult to crack open the fresh oyster. It requires the right techniques to crack them open, after much difficulty we managed and rewarded with the most succulent fresh oysters.....lovely. It was a simple dish but the freshness of the ingredients lingers on.


Moules Marinières

Ingredients
  • 3 kilograms of fresh mussels
  • 2 glass of white wine
  • 2 tsp salt
  • 50 gm butter
  • 1 clove of garlic (minced)
  • 1 bunch of finely chopped parsley
  1. Boil a kettle of hot water.
  2. Wash clean and de-beard the mussels. Put them into a pot.
  3. Pour the boiling hot water over the mussels, and boil them.
  4. The shell will start to open and reveal orangy flesh.
  5. Drained the mussels.
  6. In a pot, put in butter, and brown the garlic slightly. Put in the mussels and stir for 2 minutes.
  7. Pour in the white wine & simmer for about 7-10mins. Don't cook for too long as the flesh may turn tough and rubbery. Discard any unopen shell(as they're bad).


Served with french loaf with olive oil as dipping sauce.

Fresh oyster-served with dash of lemon juice and tabasco.
It's been awhile since I last had fresh seafood :-), am so happy.